J.A.'s Toyota 4Runner Sport Edition
4Runner Information, Photographs, Modifications, Standard and Optional Equipment, Technical Specifications, 4Runner History, 4Runner Topsites and much more...
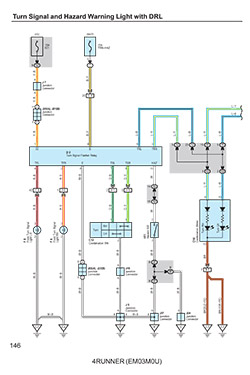
Factory (unmodified for reference) Turn Signal and Hazard Warning Light with DRL Wiring Schematic
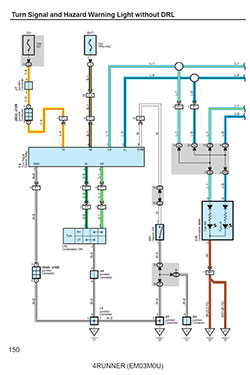
Factory (unmodified for reference) Turn Signal and Hazard Warning Light without DRL Wiring Schematic
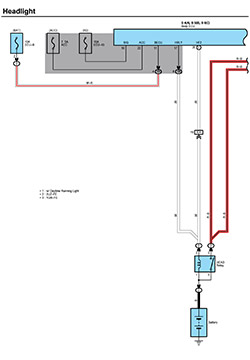
Factory (unmodified for reference) Headlight Schematic
Relay and Fuse Locations (unmodified for reference)
As an Amazon Associate, I earn from qualifying purchases
Concept:
This modification allows you to repurpose the underheadlight filler panels to become
Switchback style LED DRLs and Sequential Turn Signals.
Specifications:
This item is manufactured by 4R Customs which is a Utah based family owned and operated
small business run by brothers who are avid Toyota enthusiasts.
This product comes in two specific versions to perfectly fit all 4th Gen (2003-2009) Toyota 4Runners:
Part #: 4R-9008-20 2003-2005: Tailored to seamlessly integrate with 2003 2004 2005 model 4Runners.
Part #: 4R-9008-20-1 2006-2009: Designed specifically for the refreshed 2006 2007 2008 2009 model 4Runners which have a stepped shape filler panel.
Kit includes: A comprehensive package including both passenger and drivers side trims with everything needed for installation including 1x fuse tap, 2x t-tap, control box with attached wiring.
Warranty: 1 Year
Shipping: Fast and Free in the USA
The most popular application for this product is for the pre-refreshed 4th Gen 4Runner models (2003 2004 2005)
that have an aftermarket front bumper installed. These 4Runners have the turn signals integrated into the lower portion of the factory bumper,
rather than in the headlights like the refreshed 2006-2009 models. As such you would lose the turn signals and DRLs when an aftermarket
bumper is installed. The under headlight filler panel is a perfect location to relocate the DRLs and turn signals to without having to modify
the new aftermarket bumper.
Dual Functionality: White LEDs for daytime running lights (DRLs) and switchback function to amber LEDs for dynamic sequential style turn signals.
Advanced Start-Up Sequence: Experience a dynamic lighting animation each time you start your 4Runner. The LED trim replacement features an eye-catching start-up sequence that adds a touch of sophistication to your 4Runner's appearance.
Sequential Turn Signals: Stay safe and stylish with sequential turn signals. These LED trim replacements offer modern sequential blinking for your turn signals, ensuring maximum visibility and a sleek look.
Exceptional Quality: 4R Customs prides themselves in offering products of the highest quality. Their LED trim replacements are no exception. Crafted with precision and durability in mind, they are built to withstand the rigors of daily use and the elements including water, corrosion and shock resistance.
Flexibility in features: If you prefer, you can also wire them to remain solid white or solid amber in order to be used as DRLs only. There is also a wiring option to disable the start up animation.
Safety and Stlye: This product enhances your 4Runner's aesthetics while also playing a vital role in road safety. With its OEM style fit and finish, integrated LED Daytime Running Lights and modern dynamic Sequential Turn Signals, it significantly enhances your visibility on the road reducing the risk of accidents.
Unboxing:
The product arrived from 4R Customs U.S. warehouse quickly, packaged well and with no damage.
Remove factory bumper trim filler panel:
For the 2006-2009 model years, there is one retaining clip that needs to be removed securing the factory trim in place.
It is located at the end of the trim panel closest to the grille.
Gently squeeze the back side of the clip to remove it. Then, rotate the trim outward beginning with the area where the removed clip was.
The center section pulls straight out. The section closest to the fender needs to be yanked out as it is held in place by a plastic clip.
OEM bumper filler trim panel
OEM bumper filler trim panel
OEM bumper filler trim panel
Retaining clip
Remove retaining clip
Rotate panel outwards
Pull center section straight out
Detach section closest to the fender from plastic clip
Install the new LED replacement trim panel:
Reuse the retaining clip from the OEM trim panel and utilize it to install the new replacement LED trim panel.
Installation is the exact reverse of the removal process.
Snap new trim panel into plastic clip at fender
Reuse the factory retaining clip
Completed installation
Wiring:
Each LED panel has a yellow wire and a harness with a three-wire connector coming off of it.
Each yellow wire needs to be connected to its respective turn signal, and the three-wire harness needs to connect to the control box.
Wiring.
1. Mount the control box.
I chose to mount the control box on the passenger side because there is more room than the drivers side where the battery is located.
I used 3M double sided tape to do so.
Route the shorter of the two wire harnesses coming off the control box to the passenger side, and the longer harness over to the driver side.
In order to hide this wiring harness you need to remove the radiator trim panel.
Mount control box.
2. Remove radiator trim panel.
Remove 11 retaining clips holding the radiator trim panel in place and set aside.
Remove upper radiator trim to hide wiring.
Remove 11 retaining clips.
Radiator trim removed.
3. Route control panel harness to each side of vehicle.
Route the longer wire harness to the driver side.
Do this by pushing the clips in holding the factory wire harness that is hidden behind radiator support.
Use cable ties to attach the control panel harness to the factory harness.
For the shorter passenger side harness, simply route directly below where we mounted the control box.
Plug each wire harness into its LED trim panel.
Push in retaining clips.
Cable tie together.
4. Connect the yellow wire on each of the LED trim panels to the 12V+ wire for each respective turn signal.
This enables the amber sequential LEDs to activate with the turn signals.
If you have factory DRLs, you should extend these wires and tap into the REAR turn signal lights.
The best place to do this is at the D2 Connector on the Daytime Running Light & Turn Signal Flasher Relay which is mounted on the back of the driver side interior relay/junction box.
Rear Left is at Pin #5, blue with black stripe wire.
Rear Right is at Pin #3, blue with yellow stripe wire.
If you DO NOT have factory DRLs, you can directly connect these wires into the FRONT turn signal lights themselves.
Front Left is red with black stripe wire.
Front Right is red with yellow stripe wire.
In my case, since I have Aftermarket LED Switchback Bulbs,
I am able to tap into the OUTPUT side of the LED switchback control module.
Connect turn signal wire.
5. Connect the wires coming out of the other end of the control box.
5a. Connect the black wire to a 12V- Ground source.
3-wire harness from control box.
Add a larger fork connector to the ground wire.
Locate a 12V- ground source.
Connect the black wire to ground.
5b. Connect EITHER the red wire OR the white wire to a fused 12V+ Accessory (ACC) circuit. An Accessory circuit is one that is only on when the key is in the Accessory or On position.
The red wire will activate the White LED panel WITH an animated startup sequence.
The white wire will activate the White LED panel WITHOUT an animated startup sequence.
There is no fused 12V+ Accessory (ACC) circuit in the engine compartment.
You should extend the red or white wire, and route it to the driver side firewall grommet that you can use to pass the wiring through to the interior fuse box where you can find 12V+ ACC power.
This is the driver side firewall grommet that you will pass the wiring thru.
In my case, since I have an Aftermarket Headunit with Front Facing Camera,
I was able to extend the RED wire and connect to the 12V+ ACC wire of my front facing camera which was already located in the engine compartment area.
Existing 12V+ Acc Camera wire.
New wire connected to 12V+ Acc.
Wires organized.
Battery removed.
Wires routed along driver side
Cable tie to existing factory wiring.
Splice red wire from 12V+ ACC into Control Box wiring.
Headlights Off / Factory DRLs On
0:03 Startup Animation
0:08 White DRLs
0:10 Amber Sequential Turn Signal - Passenger
0:16 Amber Sequential Turn Signal - Driver
0:22 Amber Hazard Lights
Headlights On / Factory DRLs Off
0:28 White DRLs
0:32 Amber Sequential Turn Signal - Passenger
0:37 Amber Sequential Turn Signal - Driver
0:42 Amber Hazard Lights
Review:
Overall, the installation was straight forward, both quick and simple with only four wires to connect to the vehicle.
The white DRLs are bright during the daytime and the sequential turn signals add a nice touch to the front end lighting.
I was happy that these LEDs were compatible with my previously-installed Triton DRLs / Turn Signals.
I found that they fit perfectly in the underheadlight filler panel location using original equipment fastners.
I really like the modern look these lights bring my 16+ year old vehicle.
I would recommend this product if you are looking for a contemporary modification.
Additionally, they look like they could have come factory installed.
9-Month Update:
I have been using these Bumper Filler LEDs for almost a year now.
They have continued to work perfectly and really give a unique look to the 4Runner.
After using them for this long I decided to wire them a little differently.
I have been doing some Stealth Car Camping lately and when I return to the vehicle to retire
for the night during cold weather I like to run the vehicle for a bit to heat up the cabin before going to sleep.
With the lights wired as I described above, there is no way to turn them off when the vehicle is running and therefore they can bring unwanted attention to the vehicle by
someone afar that otherwise may not hear that the vehicle is running.
So I decided to connect these lights to my DRL Mod.
To do that I needed to disconnect the black wire coming out of the control box which I originally had run to a nearby 12V- Ground source,
and extend that wire into the cabin, connecting it to the center prong of my Cole Hersee 58027-03 DRL Mod Switch.
This makes these lights have the same operation that my factory DRLs have after performing the DRL Mod:
ON - remain on at all times
OFF - remain off at all times
AUTO - operate as per OEM (on when headlights are off, off when headlight are on)
The only downside of wiring these lights this way is that the sequential turn signals will no longer work with the switch in the "Auto" position AND the Headlights On (see chart below).
This is because the control box only has one ground wire and not individual grounds for the turn signals and the DRLs.
Also, note that the factory feature in which the DRL lighting system will not become active when the vehicle is started with the parking brake on, only works with the
DRL Mod switch in the "AUTO" position.
If the DRL Mod switch is in the "ON" position when the vehicle is started with the parking brake on, both the Factory DRLs and the Bumper Filler LEDs WILL light up.
If the DRL Mod switch is in the "OFF" position when the vehicle is started, regardless of parking brake activation, both the Factory DRLs and the Bumper Filler LEDs WILL NOT light up. Perfect for Stealth Camping.