|
Main Menu
|
|
|
|
My 2007 4Runner
|
|
|
|
4Runner History
|
|
|
|
Other
|
|
|
|
|
Concept:
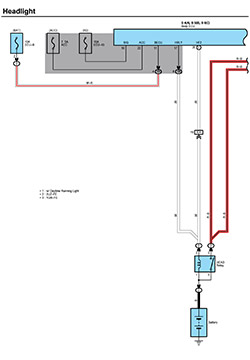
I ordered my 2007 Toyota 4Runner with the Daytime Running Lights (DRL) option.
This DRL system is designed to automatically activate the turn signal lights during the daytime to keep the car highly visible to other vehicles.
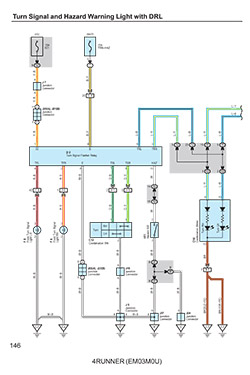
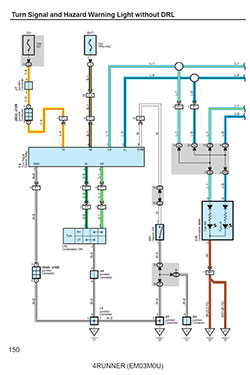
The factory drl / turn signal bulbs are 1156NA type. The law requires the use of an amber bulb for the turn signals.
Since the Toyota 4Runner 4th Generation Refresh (2006-2009) uses these 1156 turn signal bulbs as the DRLs, the DRLs are amber as well.
I would prefer a more modern updated look by having white DRLs, while at the same time keeping the turn signals amber.
The use of a Switchback style bulb system that are white while in DRL mode, but change to amber while in turn signal mode, will accomplish this.
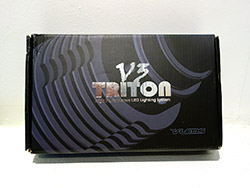
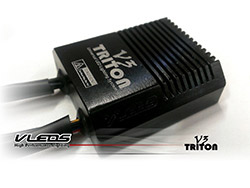
V-Leds Switchback Led System with Control Box:
V-Leds Gen2 V3 Triton Switchback Leds utilize 6 Philips Rebel 3W LEDs.
Using an exclusive design, your vehicle will have the look and safety of a high end exotic.
Boasting a maximum output of 430 lm of blazing amber (turn) and a powerful 600 lm of white (parking) light the V3 SwitchBack is unmatched in the industry.
The universal interface system ensure ease of installation and can be used in a broad range of vehicles and applications.
The V3 Tritons reaches outputs that will get your vehicle noticed in any condition.
This iconic design will change the way we look at automotive LED bulbs forever.
Features:
Smaller Control Module with built in Resistor. No Hyperflash! The load can easily be activated or removed if desired via fuse on the control box harness.
Automotive Weatherproof Connectors.
Resistor cut for factory DRL applications. The resistor automatically deactivates when the factory DRL is active.
DRL Smart Control. Automatically switches high input DRL signal to white LEDs.
Type 2 Switching Circuitry (white shuts off when amber is on).
Optically engineered lens that maximizes viewing range.
6 Philips Rebel 3W LEDs. 3 White and 3 Amber.
All aluminum construction.
Attractive anodized finish and laser engraved logos.
Adjustable positioning in housing for a more precise focal point in the reflector.
NEW 50% dimming wire for parking mode (white) when headlights are on. Connects to positive headlight wire.
Universal design for easy installation.
50,000 hour lifespan.
Limited Lifetime warranty. V-Leds will warranty these for as long as they are in production. If the V3 is discontinued they will replace the old unit(s) with the current version for up to 1 year of the date it was discontinued.
Patent Pending 2012
|
Specs:
Operating Voltage: 14.5v
Current Draw: .55 amps amber or white 2.10 amps high (with resistor active)
Color Temp: 5000K
Viewing Angle: 360
Output Total Lumens: 600lm White 430lm Amber
V Star Rating: 5
CANBUS Proof (Y/N): Yes
DIAMETER: 21mm
Diode Count: 6 Total
DUAL Polarity (Y/N): No
High Power (Y/N): Yes
LED Type: High Power
OVER Heat Protection (Y/N): Yes
OVER Voltage Protection (Y/N): No
Power (Watts): 6W (no resistor) 26W (with resistor)
|
V-Leds.com
1156 Gen2 V3 Triton Switchback LED System
5K White/Amber |
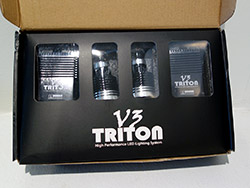
Unboxing the 1156 5K White/Amber
Led Switchbacks |

Foam lined packaging |
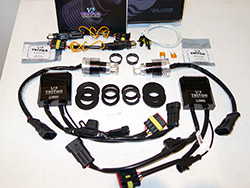
Switchback kit contents |
Color selection:
V-Leds Gen2 V3 Triton LED bulbs are a multi-application bulb system and are available in the following colors:
Switchback 5K White/Amber
Switchback 6K White/Amber
White 5K
White 6K
Amber
Red
I purchased the Switchback kit in 5000K Pure Crystal White color as I wanted the white DRL function to match my V-Leds HID Headlights and Fog Lamps
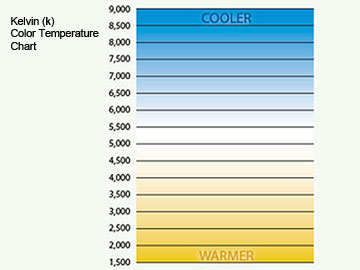
Kelvin Color Temperature Chart |
Ordering Information:
Here are the three items I ordered for my 2007 Toyota 4Runner with DRLs:
- V3 System Bulb with Control Box
- Add Bulb Base Adapter
- Add Parking Light Adapter for Single Filament Applications
- 2 Pin-3 Pin Adapter w/YELLOW Parking Light Wire.
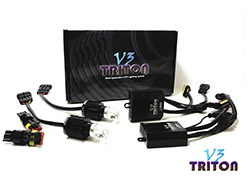
Switchback Kit |
Control Box |
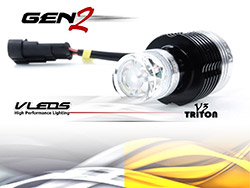
Gen2 V3 Triton |
Ordering Information:
Here is what is included in Package:
- 2 - V3 Bulbs
- 2 - Control Boxes
- 2 - 5 amp Fuses (to activate resistor)
- 2 - 50% Dimming Wires
- 2 - Base Adapters
- 1 - 8 pc Gasket Set
- 2 - 25mm Collar Adapter
- 4 - 3mm Machine Screws
- 4 - 4mm Machine Screws
- 1 - Installation Instructions
- 1 - Lifetime Warranty
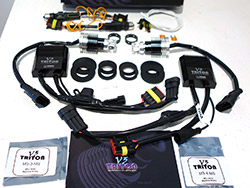
Entire Kit Contents |
A closer look:
Here are some close up shots of the Gen3 V3 Triton multi-application bulb, including overall dimensions.
Bulb Set-Up:
To set up the bulb for use in the 1156 application, first install the 25mm Collar Adapter using two of the included 4mm machine screws.
Locate the screws opposing each other as they will be used to hold the bulb in place upon installation.
Then install the 32mm sealing gasket.
To correctly set bulb focus, loosen or remove back nut.
Twist center stem until the overall bulb length as measured from the set screws to the tip of the bulb is the same as the factory 1156NA bulb.
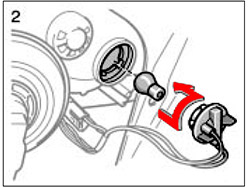
Factory bulb removal:
In order to remove the factory 1156NA DRL/Turn Signal bulb, start by disconnecting the wire connector attached to the factory bulb.
Then turn the bulb 1/4 turn counterclockwise and pull out to remove.
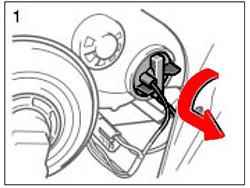
1156 Bulb removal |
1156 Bulb removal |
Pre-Installation, ensure you have the correct harness:
When ordering the 1156 single filament application kit, you are prompted to select which harness you want.
2 Pin-3 Pin Adapter w/YELLOW Parking Light Wire
2 Pin-3 Pin Adapter w/YELLOW Parking Light Wire REVERSE POLARITY GEN 5 TOYOTA 4RUNNER
The only difference between these two different 2 Pin - 3 Pin Adapter harnesses are that the #1 and #2 wires are swapped.
On the reverse polarity harness #1 wire is black and #2 wire is red. The #3 wire is always yellow.
On the normal 2 Pin - 3 Pin harness the #1 wire is red and #2 wire is black.
The 2006-2009 4Runner needs the normal 2 Pin - 3 Pin harness. The 5th Gen 4Runner (2010+) needs the reverse polarity harness.
Unfortunately I ordered the VLed Switchback kit with the reverse polarity harness thinking all 4Runners are wired the same.
Well, turns out they are not and the lights did not operate correctly.
Fortunately you can reverse the wires yourself very easily (as I did myself) rather than reordering the correct harness and waiting for shipping.
If you found this page trying to figure out which 2 Pin-3 Pin Adapter harness you need to order, there is a test you can perform to correctly identify what you need.
Remove the 1156 bulb from the vehicle. Start the vehicle. Probe the center pin in the 1156 socket.
If it has 12V+ positive voltage while operating in DRL mode, then you need the normal harness.
If the outer pin on the socket has 12V+ positive voltage, then you need the reverse polarity harness.
Installation:
Installation really is a straight forward process. Very similar to installing HIDs.
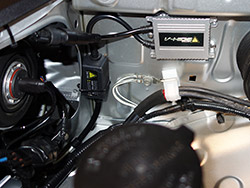
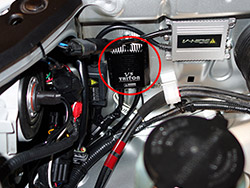
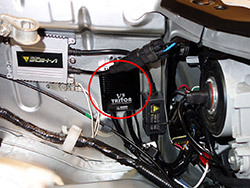
Install the Triton bulb first to get the bulb in place and out of harms way. This also allows you to see how much wiring you have so you can appropriately locate the control box.
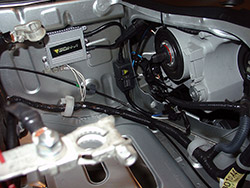
Then choose a suitable mounting place for the control box. I mounted the control boxes on the inner fender wall, next to my HID ballasts.
I did however need to relocate my HID ballasts an inch rearward to make adequate room for the switchback control boxes.
I mounted the switchback control box to the inner fender wall using one stainless steel sheet metal screw.
This required drilling a hole using a 1/8 inch drill bit. This provides a very secure mount.
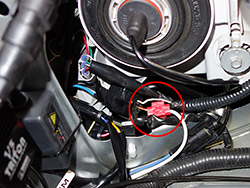
Then make the wiring connections. Start by connecting the wire connected to the Triton bulb to the control box.
After that connect the 2 Pin - 3 Pin 1156 base adapter harness to the factory 1156 socket. The other end of this harness goes to the control box.
The yellow wire sticking out of this harness is to be connected to an ignition activated 12V+ source ONLY if you want the DRLs to remain on at all times, ie. with the headlights.
Please note, that if this wire is connected there will be no way to switch the white DRLs off.
Since I have already performed the DRL Mod with On-Off-Auto Functionality,
I can omit connecting this yellow wire and have the ability to run the DRLs with the headlights as well as shut them totally off as desired.
Lastly connect the connector side of the white 50% Dimming Wire to the control box, and the other end splice into the headlight 12V+ wire using a red 3M Scotchlok connector.
This makes it so that when the headlights are switched on the white DRLs dim down automatically
as these are far too bright at night otherwise considering they have no cutoff provision.
Passenger side - Before |
Passenger side - After |

Passenger side
50% dimming wire connection |
On the driver side the installation was performed in the same manner including mounting the control box in same location.
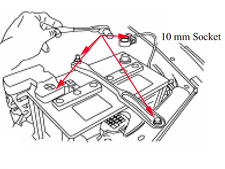
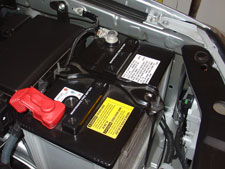
The battery needed to be removed from the vehicle first using a 10mm deep socket for both the battery cables as well as the battery hold down bracket.
The Triton bulb is difficult to get in on the driver side due to its length. While tricky, you will NOT need to remove the headlight itself to get it in, only the battery.
Battery removal needed |
Driver side - Before |
Driver side - After |
Driver side
50% dimming wire connection |
After finishing up the installation of bulbs, control boxes and all wiring, ensure all connections are tight and secure the wires out of the way using wire ties if needed.
Reinstall the vehicle battery.
Battery re-installed |
Since the battery has been disconnected, the ECU will not be able to detect and memorize the power window and moon roof positions resulting in the following features being inoperative:
One-touch open and close of driver’s door power window with jam protection.
One-touch open and close of back door power window with jam protection.
One-touch slide open and close of moon roof with jam protection.
One-touch tilt up and down of moon roof with jam protection.
To correct this we need to perform the following initialization procedures. I don't have the moonroof but include the instructions for others following along at home.
Window initialization procedure:
1. Turn ignition switch to the “ON” position.
2. Push the window switch to fully open the window.
3. Push and hold the window switch to the “UP” side until the window closes. Continue holding it for approximately 1 second.
4. Check for proper operation of the “one-touch open/close” functions by pushing the switch briefly to the “DOWN” and “UP” positions.
Moonroof initialization procedure:
1. Turn the ignition to the “ON” position.
2. Push and hold the “TILT UP” side of the switch until the moon roof tilts all the way up and then tilts down slightly (approximately 10 mm [0.39 in.] at the rear).
3. Check for proper operation of the “one-touch slide open/close” and “one-touch tilt up/down” functions by pushing the switch briefly to the “SLIDE OPEN” and “TILT UP” positions.
You will also have to re-program your radio stations as well as certain options on the factory navigation if you have that too.
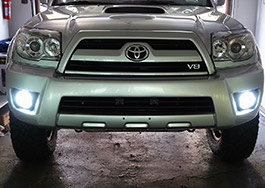
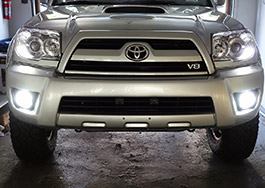
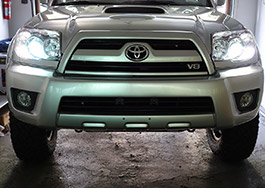
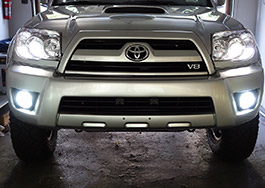
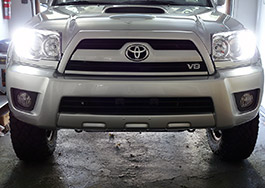
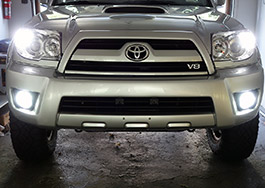
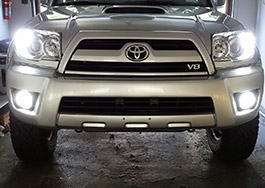
Switchback Led lighting pictures:
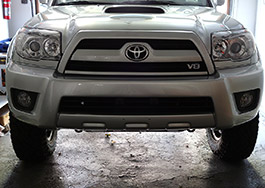
All Off |

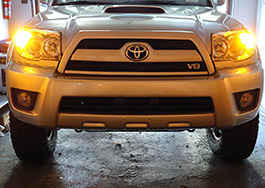
DRLs On |
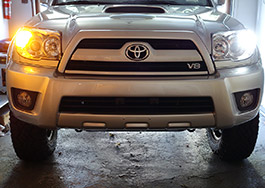
Hazard Lights On |
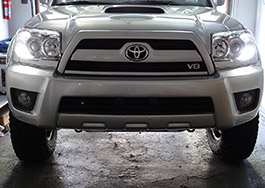
Passenger Turn Signal |

Driver Turn Signal |
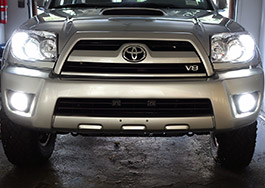
Various lighting pictures:
Parking Lights On |
Fog Lights On |
Parking Lights On
Fog Lights On |
Parking Lights On
Low Beams On |

Parking Lights On
Low Beams On
High Beams On |
Parking Lights On
Fog Lights On
Low Beams On |

Parking Lights On
Fog Lights On
Low Beams On
High Beams On |
DRLs On |
DRLs On
Parking Lights On |
DRLs On
Fog Lights On |
DRLs On
Parking Lights On
Fog Lights On |
DRLs On
Parking Lights On
Fog Lights On
Low Beams On |

DRLs On
Parking Lights On
Fog Lights On
Low Beams On
High Beams On |
Switchback Led lighting video:
|
|