|
Main Menu
|
|
|
|
My 2007 4Runner
|
|
|
|
4Runner History
|
|
|
|
Other
|
|
|
|
|
Even before purchasing this particular vehicle I knew I would have to lift it.
The 4th Generation 4Runners (2003-2009) are the lowest 4Runners to date.
Here is some comparison information.
The 1st Generation 4Runner had a stated running ground clearance of 10.6".
The 2nd Gens had a running ground clearance of 10.2".
For the 3rd generation there were a few different heights.
1996 had a stated running ground clearance of 9.5" according to the Toyota literature at the time.
1997-1998 stated 11.1". If you check the part sheets though, the 1996-1998 list the same part number for their 4WD 3.4L coil springs.
1999-2002's brochures all state 11.0" ground clearance, but the part sheets once again tell a different story.
1999-2000 share the same part number and 2001-2002 share another part number.
It is well known that the 2001-2002 4Runners and also the 1996-1998 are noticibly lower than the 1999-2000 models.
All 4th Gens state 9.1" running ground clearance.
Having owned and become accustomed to, a 1999 4R (99 is believed to be the highest year ever) for 8 years before buying my 2007 model new,
the 2007 just looks and feels just way too low. The 2007 is a full 2" lower than the 99. Hence the desire to lift.
The 1999 was a height that I was comfortable with and did not want or need to lift. So my goal for the 2007 was
simply to get it up to the same height as the 1999.
My vehicle, being a Sport Edition, came with the XREAS Sport Enhancement Suspension System as standard equipment.
It is availlable on the SR5 and Limiteds as optional equipment as long as you do not get the 3rd row seating option.
XREAS stands for "Cross Linked Relative Absorber System".
X-REAS was designed to help improve vehicle on-road handling performance.
This technology links each of the vehicle's shocks to it's diagonal counterpart via a gas hydraulic chamber.
During cornering or when traveling over bumpy surfaces, the gas hydrauilc chamber acts like a bank "borrowing"
fluid from the cross-linked shock bearing the least amount of force and "loaning" it to the shock sustaining the
greatest amount of force. This exchange of fluid helps the 4Runners wheels maintain contact with the driving surface
and helps lessen vehicle body sway, pitch and roll, making for a more comfortable ride.
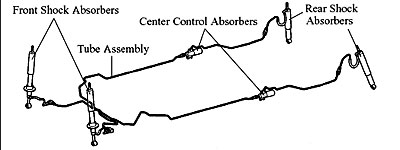
XREAS Sport Enhancement Suspension System |
Further information on X-REAS (Relative Absorber System).
Further information on Factory Toyota 4Runner Suspension.
Further information on Factory Rear Air Suspension.
Choosing a lift kit:
Basically there are three lift options you can perform. 1) a spacer lift, 2) new coils and shocks, 3) an adjustable coilover system.
I chose to go with the spacer lift kit made by
Daystar.
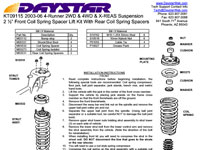
Daystar Products part # KT09115BK is the Daystar Comfort Ride spacer lift kit compatable w/ X-REAS and is marketed as a 2.5" front lift and 1.5" rear lift.
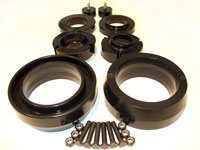
Daystar Comfort Ride Spacer Lift Kit
Compatable w/ X-REAS
KT09115BK |
Things I considered when evaluating which spacer type lift to get, prioritized with my highest concerns at the top.
- XREAS compatability
- Allocation of overall spacer height between "preload" and "topout" spacers
- Lift Height
- Spacer Material
- Compatability with factory inside the coil bumpstops
- Color
- Price
Xreas compatability - Since XREAS is something I wanted to retain, I could not change out the shocks. The XREAS system
can be removed but that is something I did not want to do. If you have been to my 4R website anytime since 1999 you may
have read my writeup of the 3rd Gen Addco Sway Bars. I installed them so as to flatten out
the ride, reduce body roll, around corners. XREAS does just that for the 4th Generation, but without limiting suspension
travel and without the increase in ride harsness caused by the addition of heavy duty sway bars. Therefore, for me, the
choice was clear, do a spacer type lift. Though spacer type lifts are much cheaper than coilover technology, price was
not a deciding factor here. I simply wanted to retain the XREAS system. I do go off-road on occasion, but on-road
performance was a higher priority.
Allocation - There are numerous spacer lifts available. I am not going to attemp to detail every kit out there in
this write up as you can, and should, spend time researching them and their differences. Each kit provides varying
amounts of lift. In terms of the front end of the vehicle that lift is provided via either a topout spacer, a preload
spacer or a combination of both. Each kit varies in it's size allocation between topout and preload creating it's
own combination of benefits and drawbacks.
The topout spacer is a spacer that sits on top of the strut assembly. It creates lift by forcing the suspension downward
thereby lifting the vehicle up. The drawback of a topout spacer is that they put the strut assembly lower than the
factory designed it to be, thereby creating the possibility of overextension especially the ball joint.
The preload spacer is a spacer that goes inside the coil assembly. It creates "preload" to gain lift, the drawback being
that they limit coil spring compression. Preload affects the ride quality more so than a topout spacer does with many people
reporting a stiffer ride. Spring rate is not affected by the addition of a preload spacer when a straight line spring rate coil
(like our factory coils and opposed to a progressive rate coil) is used. If it takes 580 lbs to move the factory spring 1" it will still
take the same weight to move the spring 1" after the addition of a preload spacer. I believe that people say ride quality gets harsher
due to the spring having less room to travel in now that the spacer is there. Full compression will be realized sooner and full extension
will be reached sooner with the spacer in there and therefore the harsher effect by topping or bottoming out the spring/shock.
That is why if ride quality preservation is the preference you should go with a spacer lift kit with a smaller percentage of lift
from it's preload spacer.

Spacer Placement |
While I wanted a kit with a combination of topout and preload, I wanted the preload to be smaller than the topout
spacer as I wanted to minimize the change in ride harshness. The Daystar (DS) kit includes a 0.5" preload and a 1" topout spacer
(due to suspension geometry you need to double the spacer size to determine lift height and yes the DS kit gave me
closer to 3" than the 2.5" of front end lift that the kit is marketed as providing). The 1" topout does not concern me.
There are kits with all topout spacing and while they are much easier to install as they do not require the use of
a spring compressor, the possibility of overextending components would concern me. On the other hand these 100% topout
spacer kits would not have an increase in ride harshness at all though. If the 1" topout spacer sizing concerns you, a Cornfed (CF) 3/2
kit reverses the DS allocation methodology and uses what appears to be a 1" preload spacer and a 0.5" topout spacer.
Lift Height - 2.5" front and 1.5" rear lift fit my needs perfectly. The sizing was at a height that would meet or
slightly exceed my goal of matching the 1999 4Runner without lift factory height.
You will notice that the front lift is 1.0" higher than the rear, that is due to the fact that the 4th Gens rear end is a
little over 2" higher than the front from the factory. I do believe that having the rear higher than the front is a good
idea...remember all those 2nd and 3rd gens with sagging rear ends? By having the front spacer provide 1.0" greater lift
than the rear, the kit will provide a leveling effect and will lessen the "raked" look while still leaving the rear 1"
higher than the front. The stance turned out to be perfect. Personally I wouldn't mind the the rear being a half to one
inch higher as in the long term 4R's in general tend to sag a little regardless of adding a spacer.
Material - Polyurethane was my choice here. I have heard from some people who needed to use rubber isolaters when using
a aluminum spacer to reduce noise or something along those lines. Didn't want to be bothered with corrosion either.
UPDATE: Some people are apparently concerned that the polyurethane material may compress and provide less lift over time.
It has now been over 5 years since the installation of this poly spacer lift on my vehicle I am not reporting any measurable difference in lift height.
If anything the rear may be measuring 1/8" lower than 5 years ago, but the measurements seem to vary each time I take them.
I attribute this more to variances based upon where I park and measure than actual sag.
Also, I am not aware of any one else reporting significant "sag" in their polyurethane spacers.
Compatability with factory inside the coil rear bumpstops - Daystar rear spacers are of the open center style.
The Toyota inside coil rear bumpstops can be reused and are inserted thru the top of the Daystar spacer.
With solid, non-open center stlye rear spacers, you may be able to reuse the Toyota inside coil rear bumpstopsby inserting them underneath the solid rear spacer rather than thru the top.
Color - DS is black poly, no need to paint and worry about repainting down the line. I Didn't want the spacer to stick out, but rather to blend in and be unobtrusive.
Price - The DS kit at approx $265 is a fair value. Similar in price if not lower than many other spacer lifting options out there.
Install it yourself or you will spend more getting it installed that the kit costs.
Tools Needed:
|
Floor & Bottle Jacks
Jack Stands, pair
Pry Bar(s)
Hammer
Pitman arm puller (Autozone #OEM27016) or ball joint puller or tie rod end puller
Handheld coil spring/strut compressor, pair (Autozone #OEM27036)
Locking (Vice Grip) Pliers
Work Platform to rest XREAS strut assembly on
12mm socket
14mm socket
17mm socket
19mm deep socket
Socket Cap (used with wrench to turn sockets in low clearance access areas)
14mm open/closed end wrench
17mm open/closed end wrench
19mm open/closed end wrench
6mm hex socket
|
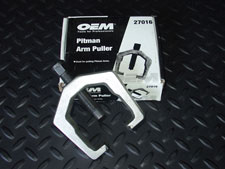
Pitman arm puller |
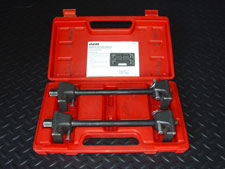
Handheld coil spring/strut compressor |
Installation:
Although I do as much work on the 4R myself as possible, both maintenance and mods, Working on the suspension
is not really something I wanted to do. Through my research on lifting the 4Runner, I found that it is pretty
straightforward without XREAS, but having an XREAS equipped 4R makes the job a different ballgame, one in which
your local shop has most likley not encountered. You cannot disconnect the XREAS hydraulic lines connected to the
shocks at all. Once fluid leaks out and air enters in, the system needs to be entirely replaced.
There is no way to flush or recharge the system. So this job requires working in the wheel well with handheld spring
compressors. Additionally there is the Skid Control Sensor wires right there that cannot be stretched or damaged.
Same goes for the brake lines.
Various shops I spoke with would have nothing to do with a job like that, with them taking responsibility
for potentially runing an expensive XREAS or ABS/Traction/Skid Control system, and not being able to use their
wall mounted compressors. Actually, after talking with a bunch of shops, I did not want them to touch my vehicle afterall.
I would have to stand over them to make sure the job was done to my specs and guide them through the job,
paying for many hours of labor. So I decide to do it myself.
Daystar Installation Instructions |
Front Install:
Begin the front spacer installation process by first removing the front and rear engine skid plates. Each skid plate is attached with 4 12mm bolts.
An extension bar will be needed for your ratchet to reach some of the bolts. These bolts are of the self-tapping type, so when re-attaching later be careful not to cross thread.
These bolts are M8x1.25mm 23mm long. If you would like to you can replace them with regular machine bolts M8x1.25mm 25mm long, which is a common size.
FSM Front |
Remove the front sway bar. Especially with XREAS, you are going to need as much room to work within the wheel well as
possible, so just remove the entire sway bar. Undo the 17mm nut attaching the 2 sway bar links to their respective
steering knuckles. If the ball joint turns together with the nut, use a 6mm hexagon (allen) socket wrench to hold the stud.
Remove the 2 14mm bolts on each of the 2 stabilizer bar brackets. Set the sway bar aside.
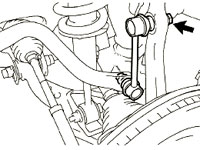
Sway Bar Link |
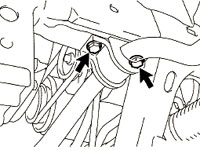
Sway Bar Bracket |
Loosen the lug nuts on both front wheels. Place floor jack under the front crossmember. Jack the vehicle up high enough
so that both front wheels are around 5" off the ground. Place jack stands under the frame rails behind the front wheels.
I used a pair of 6-ton safety stands which I prefer as their height range goes up to 24". Remove one front wheel and
work on one side at a time. Remove the floor jack from the crossmember and place under the lower control arm
on the side you just removed the wheel from.
Next we will seperate the upper ball joint. Remove the cotter pin. Remove the castle nut. Then seperate the joint
using a puller type tool. Do not use a pickle fork type tool as they may tear the ball joint boot. I used a
pitman arm puller that I took out on loan from Autozone. With their tool loan program, you pay full price for the tool
up front and then have 90 days to return it for a full refund. You don't need to buy anything from them when taking
a tool out on loan either.
Ball Joint Removal |
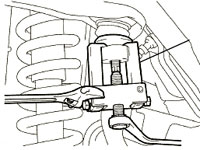
Remove the three 14mm upper strut tower nuts. I used an open ended wrench on a
Socket Cap
attached to a 14mm socket. By doing this you can make quick work of removing the rear nut which is impossible to use a
ratchet on due to limited clearance, and also tough to use a wrench on as the turning radius is limited as well.
You put the 14mm socket on the rear nut, then put the socket cap in the socket. Then using an open ended wrench
becomes easier as the wrench is elevated above the center strut bolt but still has enough room below the wheel well
to turn in a wide arc.
Remove the lower strut bolt. A 19mm deep socket would be best. I didn't have one on hand so I used a 19mm
open ended wrench. It worked but you need to be careful as you may need to angle the wrench slightly
to get clearance to turn the wrench without hitting the rotor and the wrench can slip and strip the nut.
Once the nut is off, pull down on the upper control arm by hand and slide the lower part of the strut off the
mounting stud.
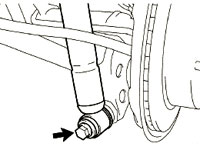
There is a bracket holding the XREAS line to the vehicle. Remove the bolt from the bracket so as to have a little more slack in this line to work with.
Remember, you cannot disconnect the hydraulic line at the shock body.
You can remove it at a certain union joint but I decided not to so as to not take a chance at loosing any unreplaceable hydraulic fluid.
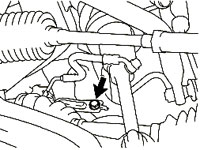
XREAS Bracket |
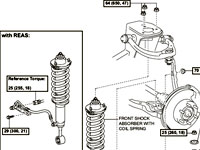
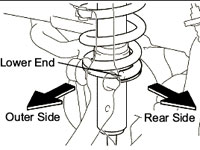
Make note of how the strut assembly is mounted in the vehicle. The lower end of the coil spring faces rear side of the vehicle.
Note how the lower shock absorber bushing faces relative to the three upper mounting nuts.
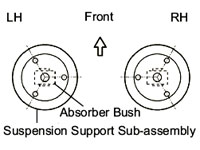
Bushing Alignment |
Now push up on the upper control arm and pull out the strut assembly from the upper mount.
Maneuver the assembly on to your work platform. All the while be extremely careful to not put any tension on the XREAS line, brake line or sensor wires.
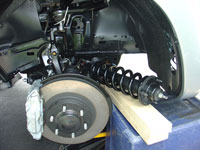
Strut Assembly on Work Platform |
Attach the coil spring compressors to the spring. Crank them down using a 19mm open ended wrench. Compress the spring
until there is approximately 3/4" space. This part really is not hard to do. You do not need air tools at all.
Now that the strut has no tension on it, hold the upper shock absorber rod with the locking pliers (vice grips) and
using a 17mm open ended wrench undo the nut.
Remove the upper mounting plate. Discard the rubber coil spring isolator. Remove the three bolts from the upper mounting
plate. This can be accomplished in either of two ways. Place a deep socket over the bolt and 1) press the stud out
using a vice (see pic). or 2) hammer the stud out. Then press or hammer in the new 10mm longer bolts.
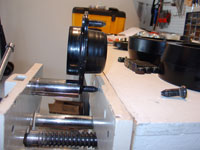
Pressing out the studs
from the top plate |
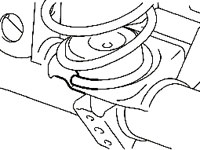
Install the M03273 preload spacer (1/2" thick) where the rubber coil spring isolator was. Put back the upper mounting
plate now that it has the longer bolts in it. Put the nut back on the shock absorber rod while continuing to hold the
rod with the vice grips. Release tension on the coil spring compressors, making sure to align the lower end of the coil
spring into it's seat and that the alignment of the lower shock absorber bushing faces properly relative to the three
upper mounting nuts.
Spring Orientation - Front |
Place the M03532 top out spacer (1" thick) on top of the assembly, over the three 10mm longer bolts.
Now install the strut assembly back into the strut tower on the vehicle. This step takes a lot of time to get the
now longer assembly back into place. Obviously install the top end first. To do this you will need to push up on the
upper control arm using a pry bar. Try to catch a nut as soon as a stud goes in the tower so that you can have
your hands free and not worry about having tension on the XREAS line. Again, you must be real careful to avoid
having tension on the and XREAS line, brake line or sensor wires. Not a simple task especially if you are one person
working alone, but it can be done.
You will need to use the factory bottle jack upside down with the bottom side pressing
on the upper wheel well and the top side pushing downward on the upper control arm. Sorry I don't have more real world pics
of stuff like this but since I was doing the install myself, alone, I lost track of pic taking and was real concerned with
not overextending the lines at this point. This step takes a lot of time to get the now longer assembly back into place.
You will need to raise and lower the floor jack (lower control arm), as well as extend and contract the
bottle jack (upper control arm) multiple times to get the assembly in place. In order to get the lower shock bolt back in you
will need to pry the lower eye into place using a large screwdriver, then hammer the bolt into place and secure the nut.
Tighten the three nuts to the upper strut tower. Remember to use the nylock nuts Daystar provides. These nuts are
larger and now require a 17mm open/closed wrench. You can use the socket cap on the back nut to make the job easier.
Put back the castle nut on the ball joint and tighten it enough so that you can insert the cotter pin.
Reinstall the XREAS bracket to the vehicle.
Now that you have completed one side, start the vehicle and look for any trouble lights (ABS) to see if you damaged anything.
The repeat the steps for the other side. Once done, install the wheels, lower vehicle, install the sway bar and install
the skid plates.
This completes the front install. This took me, working alone, 8 hours. 5 hours for setting up and completing the
first side. 3 hours for the second side once I got the hange of it.
Rear Install:
I had planned to complete the rear install the same day as the front. As luck would have it the front install took longer than planned and the day was shot.
I had an appointment the very next day to install my special order 32" Bridgestone Deuler A/T Revo tires as well as get an alignment. So rather than cancel the install and postpone
everything by a whole week, I asked the tire/alignment shop to install the rear spacers.
The rear spacer install is very straight forward so I did not feel I needed to do the install myself like I did with the front.
The shop agreed upfront to allow me to watch over the installation (for peace of mind on my part) as well as charge me only one hour of labor for the job.

FSM Rear |
The install took all of 15 minutes with two people working on it. Hours faster than it would have taken me working alone.
The vehicle was lifted using the hydraulic lift. Two screw jacks were placed under the rear axle and the vehicle slightly
lowered to put the weight of the axle on the screw jacks. The lower shock bolt was removed and the lower shocks were
pryed off their mounts. The screw jacks were lowered so as to not touch the axle thereby releasing tension on the springs.
The springs were removed, along with the coil spring isolator bump stops, by hand by pressing down on the axle a little.
Note here that the neither the sway bar nor the panhard rod (rear lateral control rod) was needed to be removed.
Also the XREAS lines don't come into play as you do not unbolt the top of the shock.
Rear Shock Bolt |
The coil spring isolator bump stops were inserted into the M03531 rear spacers (1-1/2" thick). This was then put on top of the coil and the coil was pryed back into it's perch.
This part did take a minute or two. One guy held the spring/spacer/bumpstop combo in place and the other guy used a long (4 foot) pry bar to shoe horn the spring back into place.
Just be careful to not place the pry bar on any sensor wires in the area.
Align the lower coil so it sits into it's proper place, then use the screw jacks to hold the weight of the axle so the lower shocks can be bolted back up.
Spring Orientation - Rear |
Alignment:
Get an alignment as soon as possible after lifting a vehicle. I had my 1" larger tires installed right after the
lift. Then I had the alignment done at the same place.
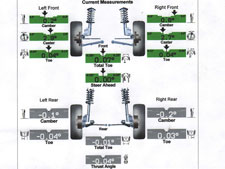
Before / After alignment specs |
End Results:
My "after" measurements below reflect both the lift from the spacer install as well as the larger tires.
The upgraded tires I chose were Bridgestone Dueler A/T Revo with UNI-T AQII P265/70/R17 p-metric standard load and they measure 31.7" overall diameter.
This is compared to the tires that come as standard equipment on the 2007 4Runner Sport Edition which are Dunlop Grandtrek AT20 P265/65/R17 and measure 30.6" overall diameter.
This difference of 1.1" will add a further 1/2" lift to the vehicle on top of the spacer lift. As you will see below, if you subtract that 1/2" from the lift gained from the spacer/tire combo
the Daystar kit provided me with 3.00" front lift and 1.625" rear lift. A little higher than expected. I am very happy with the kit and the lift it gave as It met and slightly exceeded
my goal of matching the height of my 1999 4Runner Highlander that has 32" tires while reducing (by 1") the nose high stance inherent with all 4th Generation 4Runners.
Follow Up:
I have had this lift installed for 5 years now. Nothing negative to report and I do still like it very much. No noticeable sag, or spacer compression.
The thing to note is that Daystar's Comfort Ride Suspension Lift Kit part #KT09115BK has been changed significantly and is now marketed as what they call an "Easy Install" kit.
They have eliminated the preload spacer and the topout spacer was made larger to accomplish the same front end lift.
The ride quality should remain virtually unchanged from factory as there is no preloading of the coil spring. Overall installation is easier as you do not need to compress the coil spring
and remove the top plate as stud extensions are included thet fit over the factory bolts rather than using longer studs which would require the compression and opening of the coil pack.
I am sure this marketing strategy will attract more buyers as it is a simpler install, but if this was the way they made them when I made my decision to purchase I would have decided differently.
Like I mentioned above I prefer having some preload, while minimal to reduce ride harshness, but still enough to reduce the topout size and the potential for overextension of the
suspension system. While the original (preload and topout style) DS #KT09115BK has been officially discontinued by Daystar, they will specially make the discontinued old style kit for
retailers on a one off basis that place a special order for them in bulk. Wheeler's Offroad in Oregon,
says they are comitted to selling both the new and old stlye DS kits.
Toyota FJ Cruiser Springs:
It is well known that the 4Runner springs can be swapped out for FJ Cruiser springs and they not only fit, but provide between 1/4" to 1" of lift.
This is due to a combination of being slightly longer and having a slightly higher spring rate.
Many 4Runner enthusiasts find the increase in added height along with the firmer ride desirable.
After 5 years with the Daystar spacer lift alone, I decided to add FJ Cruiser Springs to the mix.
I picked up a full set of 4 springs off a 2011 Toyota FJ Cruiser 4X4 'NSSE' model with 7,800 miles.
The NSSE designation is not really important as all FJ Cruiser 4WD springs are said to be the same, but but for those who are curious as to what this is please read on,
others can skip to the next paragraph.
NSSE stands for 'Not So Special Edition'.
Because of the March 11, 2011 Great Tohoku Japan Earthquake & Tsunami (9.0 on the Richter scale), Toyota couldn’t make as many Trail Teams (TT) models that particular year.
Toyota marketed these as having "Upgrade package #3", basically a TT model but missing the Bilstein shocks, multi-gauge dash cluster, 115 volt cargo area plug, TT Wheels and badging.
You will notice that all 4Runners (FJ's too) have a side to side lean of between 1/4" to 3/4" with the drivers side being lower. Mine is a about 1/2" lower.
This is due to the weight of the battery and gas tank both being on the drivers side.
I am not sure why Toyota lets this be, as they do have a unique driver side coil spring which is longer, stiffer and has more coils than the passenger side.
In the case of the 2011 FJ 4WD the front driver spring is marked with purple/gray paint while the passenger side is purple/orange.
To attempt to reduce this lean, while installing the FJ Springs I was going to re-use (rather than eliminate) the front rubber coil spring isolator and out back
use a 10mm OME rear trim spacer
part number 150PR10R (Prado 150). The OME 10mm packer spacer goes on top of the factory bumpstop insert which goes into the DS rear spacer.
I say "was" going to re-use the front rubber coil spring isolator as I was unsuccessful in my attempt to install the Front FJ springs.
I first noticed this was going to be tough when I could not compress the FJ front springs enough to get the DS spacers and top plate far enough on the shock to be able to put the shaft nut in place.
The handheld compressors were cranked so much that they were starting to bend a little and it was really tough to crank them down any more. With safety in mind, I tried the "no spring compressor"
method of installation. This is where you lossely assemble the spring, shock, spacers and top plate and then seat the top plate into place on the vehicle. You then bolt up the lower shock
mount and use a jack to compress the assembly by jacking up under the lower control arm. But as you can see by the pic, the assemble was too long to get the lower shock bolt into place
with out dissasembling the lower ball joint which would allow the lower control arm to drop even more that using the upside down factory jack to push the upper control arm down as I was doing.
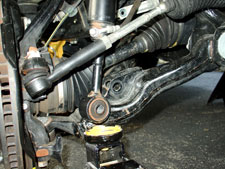
Front (unsuccessful) FJ Spring Installation |
I was successful at installing the rear FJ springs along with the 10mm OME trim packer. It took me about an hour per side to install the rear springs working alone.
What I did first was to disconnect the rear sway bar end links, then put the opposite side that I was going to work on up on a jack stand so the side I was working on would have enough room to droop for the install.
I then jacked up the side I was replacing the spring and removed the wheel. Then slowly let the jack down until all weight of the axle was off the jack. Put the spring compressors on the
spring and crank down a little. Also put the factory bottle jack inbetween the bumpstop and the axle to spead the two apart. If you do this you wont need to unbolt the rear shock.
The spring will come right out along with the DS spacer and factory inside the coil bumpstops. I compressed the FJ spring, assembled the 10MM OME trim packer (driver side only),
the inside the coil bumpstop and DS spacer and put them into place the same way the 4R spring was taken out. Like I said, very easy and about 1 hour per side.
You will note by the measurements below, I gained just about 3/4" additional lift from the rear FJ Spring swap while
adding a little firmness to the ride and slightly more load-carrying capacity.
The 10mm OME trim spacer did absolutly nothing in regards to equalizing the side to side lean.
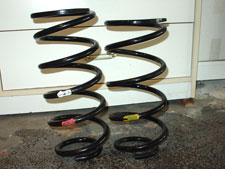
Rear Spring Comparison |

Rear FJ Spring Installation |
Before and after measurements and variances:
| Vehicle & Setup |
F/R |
Driver
Side |
Pass
Side |
Driver
vs. Pass |
1999 4Runner Highlander 4WD V6
P265/75/R16 (32's, no lift) |
Front
Rear
Rear vs. Front |
36.250
36.250
0.000" |
35.875
35.875
0.000" |
0.375
0.375
|
2007 4Runner Sport 4WD V8
P265/65/R17 (31's, no lift) |
Front
Rear
Rear vs. Front |
32.875
35.250
2.375" |
33.375
35.750
2.375" |
(0.500)
(0.500)
|
2007 4Runner Sport 4WD V8
P265/70/R17 (32's, Daystar KT09115BK) |
Front
Rear
Rear vs. Front |
36.375
37.375
1.000" |
36.875
37.875
1.000" |
(0.500)
(0.500)
|
2007 4Runner Sport 4WD V8
P265/70/R17 (32's, Daystar KT09115BK, Rear FJ Springs, 10mm OME Trim Spacer on Driver side) |
Rear |
38.00 |
38.50 |
(0.500) |
2007 w/ 32's & Daystar Lift vs. 2007 Factory
|
Front
Rear |
3.500
2.125 |
3.500
2.125 |
|
2007 w/ 32's & Daystar Lift vs. 1999 32's no lift
|
Front
Rear |
0.125
1.125 |
1.000
2.000 |
|
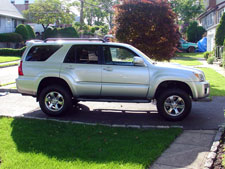
| AFTER - DS Spacer Lift & Rear FJ Springs |
|
|
|