|
Main Menu
|
|
|
|
My 2007 4Runner
|
|
|
|
|
|
|
|
|
|
|
|
|
*New*
|
|
|
|
|
|
|
|
|
|
|
|
|
|
|
|
|
|
|
|
*New*
|
|
*New*
|
|
|
|
|
|
|
|
|
|
|
|
|
|
|
|
|
|
|
|
|
|
|
|
|
|
|
|
|
|
*New*
|
|
|
|
|
|
|
|
|
|
|
|
|
|
|
|
|
|
|
|
|
|
|
|
|
|
|
|
|
|
|
|
|
|
|
*New*
|
|
*New*
|
|
*New*
|
|
|
|
|
|
|
|
*New*
|
|
*New*
|
|
*New*
|
|
*New*
|
|
|
4Runner History
|
|
|
|
Other
|
|
|
|
|
Concept:
This page details the upgrading of my Toyota 4Runner's exterior driving lights from the factory halogen bulbs to High Intensity Discharge (HID) type lighting.
This was done in order to significantly increase overall nighttime driving visibility as well as to change the color of the yellowish halogen lighting to a more modern looking
whiter & cooler color range.
HID lamps produce light by striking an electrical arc across tungsten electrodes housed inside a specially designed inner fused quartz or alumina tube. This tube is filled
with both gas, typically Xenon gas, and metal salts. The gas aids in the starting of the lamps. Once the arc is started, it heats and evaporates the metal salts forming a plasma,
which greatly increases the intensity of light produced by the arc and reduces its power consumption. The result is a highly efficient, high output, long lasting lighting system
that makes more visible light per unit of electric power consumed than other types of lighting (fluorescent, incandescent, etc.) as a greater proportion of their radiation
is visible light as opposed to heat.
V-HIDS Headlight Conversion Kit:
While there are many manufacturers of HID lighting kits, the choice for me was a very simple one. V-Leds V-HID Xenon.
I have been using various V-Leds LED lighting products on my vehicles for years now and have been very satisfied with their products. They make high quality products for a very fair price.
My intial reaction after putting VHIDs into service on my vehicle is that they have continued this theme with this product line once again.
I have purchased two V-Leds V-HID HID lighting kits. One for the low beam headlamps and one for the fog lamps. For both I went with their 35W Slim Ballast Xenon Headlight Kit.
The 2006 thru 2009 4Runner's use H11 bulbs in the Low Beam headlamps (H11_5K_S_HID)
and 9006 HB4 bulbs (9006_5K_S_HID) in the Fog Lamps.
These HID lights put out 3200 lumens of light as compared with 1350 lumens for standard halogen H11 bulbs and 1000 lumens for standard halogen 9006 HB4 bulbs.
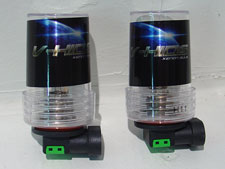
The V-Leds VHID kits offer the latest in High Intensity Discharge (HID) Xenon technology. V-HIDS utilize ultra slim-line ballasts with next generation technology for optimal
light output and ballast efficiency. Their exclusive HID conversion kit provides a level of performance and quality that is unmatched by similar HID products found by other manufacturers.
Their ultra slim design enables for an unobtrusive installation as well as be used in a wide variety of applications.
Features:
Ultra-slim design
Light weight ballasts
Automatic reverse polarity protection
Ballasts measure 5/8"H x 2-9/16"W x 3"L (15.69mm x 65mm x 75mm)
Weighs 7 oz (200 g)
Simple Plug n' Play installation
Water proof up to DIN 40050 legal standard
Dust proof up to SAE J575 legal standard
Shock proof up to DIN 40050 legal standard
Low voltage protection: when voltage of battery is less than 9v the ballasts will stop working to avoid draining battery
Overload voltage protection: when voltage of battery is more than 16v the ballasts will shut off to prevent the bulbs from burning out
Short circuit protection: ballasts will turn off to avoid electrical shock
Full 1 Year Warranty
|
Performance:
High output: 3200 lumens
Output: 35W
Efficiency: > 84%
Wave shape: square wave
Frequency of steady state: 400hz
Starting input voltage: 9-16v
Operating input voltage: 7-19V
Min. output current: more than 0.3A
Max.input current: less than 8.5 A
Open circuit voltage: 400VDC
Input current: less than 1.46A
Ignition voltage: more than 23kV
Nominal lamp voltage: 85VAC
Stabilization time: less than 1 min.
Ripple voltage: less than 5V
Certificates: E-mark, FCC, CE, UL
RoHS comliant
|
Benefits:
3X brighter than halogen lights for greater nighttime driving visibility
10X longer lasting, no need to replace bulbs for life of vehicle
Plug n' Play installation, No modifications required to your vehcile
100% reversible to original factory halogen lights
35% less power consumption
Generates less heat
Highest industry standards
Extra long wiring harness for easy installation
|
V-Leds HID Headlight System |
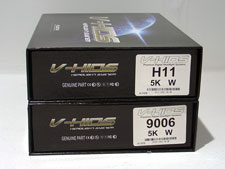
H11 Low Beams
9006 Fog Lamps |
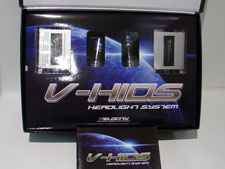
Instruction manual included |
Foam lined packaging |
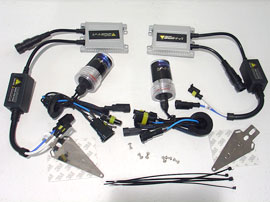
V-HID HID kit contents |
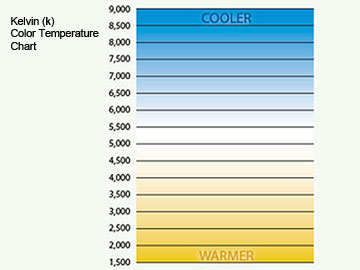
Kelvin Color Temperature Chart |
Color selection:
Color selection is a big part of selecting an HID kit.
Color temperature is one of the biggest misconceptions regarding lighting. The Kelvin (K) rating simply measures the color output of the light on the Kelvin color temperature scale.
It does not measure the amount of light output of the bulb. The intensity of the bulb is measured by luminosity. The lower the color temperature, the more yellow the coloration.
The higher the color temperature, the more blue the coloration.
Luminosity goes down as you climb the color scale. This is due to the amount of blue light that is present. Bulbs with more blue color actually reduce headlamp performance
and increase dangerous glare. This phenomenon is a result of the fact that blue and violet are the shortest wavelength and highest frequency colors of visible light.
As such, they scatter the most readily.
Halogen light bulbs are 3250K in color. Most factory original equipment manufacturer (OEM) HID kits are 4300K in color.
While 3000K color provides the greatest contrast (which many believe is well suited for foul weather, fog, snow, etc.), 4300K color provides the most lumens to the ground.
I chose to purchase the VHID kits in 5000K Pure Crystal White color. I wanted lighting that is as white as possible without going over into the blue range.
I feel that 5000K is a good balance between color and lumens to the ground.
Plug n Play or Retrofit type installation?
A Plug n Play installation is just that...a very simple installation whereas you remove the factory bulbs, install the HID bulbs, mount the ballasts and ignitors, plug in the wire harness
and you are basically done.
A full retrofit comprises of a complete headlamp removal in order to "retrofit" true HID projectors from a vehicle that came with HIDs from the factory into one that did not.
This type of install requires a considerable amount of permanent modification to your stock headlights but will allow for maximum lighting performance.
The installation I will be performing is the Plug n Play type.
The 2006-2009 Toyota 4Runner's came from the factory with halogen projector beam headlamps as standard equipment. While not a good as HID projectors, they are significantly better
suited for an HID install than the 2003-2005 4Runner's multi-reflector stlye headlamps.
I can always upgrade in the future by retrofitting in true HID projectors if need be and I will be able to re-use the ballasts, ignitors and wire harness from this kit,
though I would need to get new bulbs that are compatable with the HID projectors that would be chosen for the retro.
Pre-Installation Set-Up:
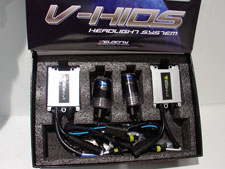
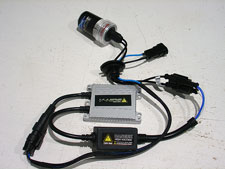
Open up the kit and get familiar with the contents. The kit comes with everything you will need for a complete installation. Take a look at the pic below.
You will find the kit includes the HID bulbs, ballasts, ignitors, high power wiring harness, brackets (which I did not use), double sided foam tape (also not used) and wire ties.
Assemble the kit by starting with the high power wiring harness. Plug one end into the ballast. Leave the other end alone, that will connect to the bulb connector on the vehicle.
Then connect the ignitor wires to the HID bulb.
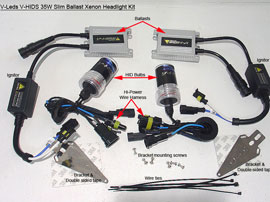
Entire HID kit contents |
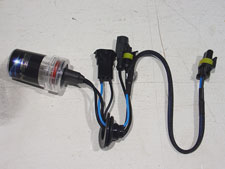
HID bulb and wiring harness |
One side of the plug n play HID kit
assembled and ready for installation |
Now onto the HID bulb itself. The H11 bulbs need some preparation before installing, the 9006 bulbs did not.
First remove the factory H11 low beam bulb to have it available for reference.
Start by disconnecting the wire connector attached to the factory halogen H11 low beam bulb. Then turn the bulb 1/4 turn counterclockwise and pull out to remove.

H11 Low Beam Bulb removal |

9006 Fog Lamp Bulb removal |
Notice the HID bulb comes well protected in a plastic container. Unscrew the container to open. Be very careful to NOT touch the bulb in any way, especially with your skin as the
oils on your skin will reduce the bulb life significantly. If you happen to touch it by accident, clean promptly with an alcohol pad.
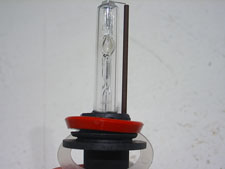
Pull down on the clear plastic ring as you need to remove this. Then pull down
on the rubber gasket to seat it. Refer to the factory halogen bulb and ensure this gasket is seated the same way.
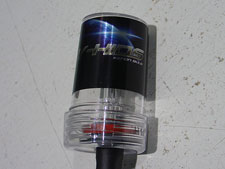
Bulb protection |
Remove clear plastic ring |
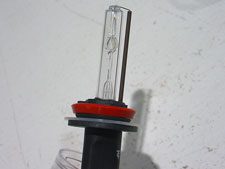
HID H11 Bulb |
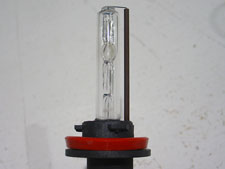
Pull rubber gasket down |
You can reuse the plastic HID bulb case to protect your halogen bulbs for storage.
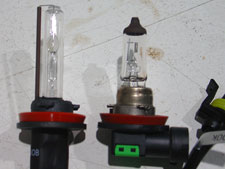
HID H11 (left)
Halogen H11 (right) |
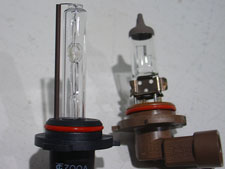
HID 9006 (left)
Halogen 9006 (right) |
Reuse bulb casing
to protect factory halogen bulbs |
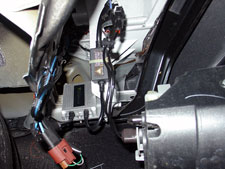
Look at these two pics below. When we begin the installation, you will need to ensure that the wires are connected with the correct polarity. The VHID kit has reverse polarity protection.
So nothing wrong will occur if connected incorrectly, but the lights wont activate. The connector on the high power harness that mates up with the factory bulb connector on the vehicle
can only be plugged in one way. When plugged in the black wire needs to connect to the negative wire on the vehicle connector. On the 4Runner the negative wire is typically a
white wire with black stripe. You may need to reverse how the wires are set in the HID high power connector in order so they line up correctly. The reason for this is that the 4Runner,
and all Toyota's I believe, use the negative headlight wire to switch on the lights. The typical HID kit is set-up for a positive trigger, hence the reversal of wires needed.
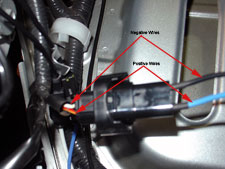
Ensure correct polarity |
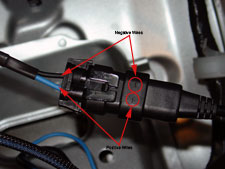
Ensure correct polarity |
To switch the wires around in the connector of the high power wiring harness, insert a small screwdriver between the silver pin and the black clip, then pull the wire out the back of the
connector. Flip the orientation around and reinsert. They will snap into place and lock when inserted correctly.
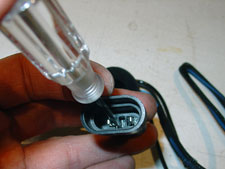
Use small screwdriver
to remove pins from socket |
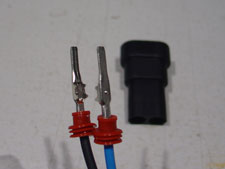
Reverse the polarity and reinsert |
You can remove the rubber grommet from the high power wire harness as it is not needed for this application. It will allow the wires to extend longer and be organized more neatly
with it removed as well.
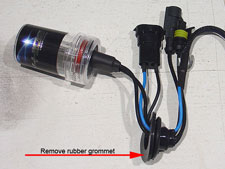
You can remove the rubber grommet
from the high power wire harness |
Installation:
Installation really is a simple plug n play operation. Install the HID bulb first to get the bulb in place and out of harms way.
Then find a suitable mounting place for the ballast and ignitor. I mounted both the ballast and ignitor on the inner fender wall.
For the ballast I chose to mount directly to the inner fender wall using two stainless steel sheet metal screws rather than the included double sided foam tape or the included bracketing.
This required drilling two holes using a 1/8 inch drill bit. I feel this provides a very secure mount and will not fail due to hot and cold cycles or moisture issues.
For the very lightweight plastic ignitor I used the included wire ties to secure to an existing hole on the inner fender wall.
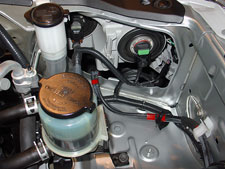
Passenger low beam - Before |
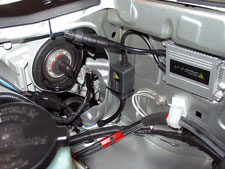
Passenger low beam - After |
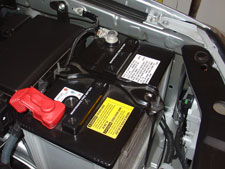
On the driver side the installation was made in exactly the same location. The battery needed to be removed from the vehicle first and a 10mm deep socket was used for the battery wires
as well as the hold down bracket.
Driver side |
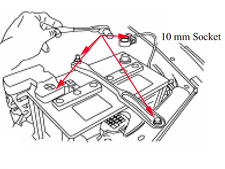
Battery removal needed |
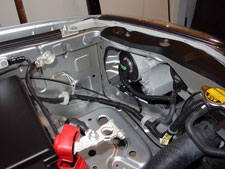
Driver side low beam - Before |
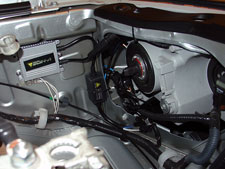
Driver side low beam - After |
The fog lamp installation is exactly the same though it took a little longer as you are working from below. Again I drilled a 1/8 inch hole to mount the ballasts. This time
securing them with only one screw due to the tight working conditions. I used a dremel to drill the hole as the tool is easier to fit into that space. I was surprised at how tight I
was able to get the ballast to the vehicle with only one screw. I mounted them up high to keep them out of as much splashing water as possible even though they are waterproof.
The ignitor was secured using a cable tie to the plastic headlamp mounting bracket.
Driver side fog lamp - After |

Passenger side fog lamp - After |
After finishing up the installation of bulb, ballast and ignitor, ensure all connections are tight and secure the wires out of the way using the provided wire ties.
Reinstall the vehicle battery.
Since the battery has been disconnected, the ECU will not be able to detect and memorize the power window and moon roof positions resulting in the following features being inoperative:
One-touch open and close of driver’s door power window with jam protection.
One-touch open and close of back door power window with jam protection.
One-touch slide open and close of moon roof with jam protection.
One-touch tilt up and down of moon roof with jam protection.
To correct this we need to perform the following initialization procedures. I don't have the moonroof but include the instructions for others following along at home.
Window initialization procedure:
1. Turn ignition switch to the “ON” position.
2. Push the window switch to fully open the window.
3. Push and hold the window switch to the “UP” side until the window closes. Continue holding it for approximately 1 second.
4. Check for proper operation of the “one-touch open/close” functions by pushing the switch briefly to the “DOWN” and “UP” positions.
Moonroof initialization procedure:
1. Turn the ignition to the “ON” position.
2. Push and hold the “TILT UP” side of the switch until the moon roof tilts all the way up and then tilts down slightly (approximately 10 mm [0.39 in.] at the rear).
3. Check for proper operation of the “one-touch slide open/close” and “one-touch tilt up/down” functions by pushing the switch briefly to the “SLIDE OPEN” and “TILT UP” positions.
You will also have to re-program your radio stations as well as certain options on the factory navigation if you have that too.
Light Aiming:
According to the AAA Foundation’s report,
Countermeasures for Reducing the Effects of Headlight Glare , as many as 50 percent of all
headlamps on the road, over 110 million vehicles, may be misaimed. Shock, vibration and wear and tear are the greatest contributors to headlamp misalignment.
Since HID's are three times as bright as the factory halogen lighting, the aiming is critical to avoid blinding other drivers on the road.
Detailed Headlight Aiming Procedure (PDF)
Detailed Fog Lamp Aiming Procedure (PDF)

Headlight Aiming |

Fog Lamp Aiming |
Before and After HID lighting pictures:
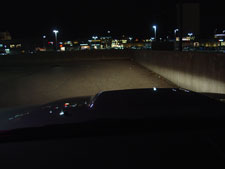
Before
Fog Lamps |
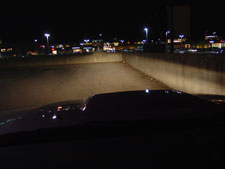
Before
Low Beams & Fog Lamps |
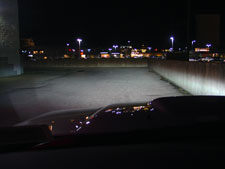
After
Fog Lamps |

After
Low Beams |
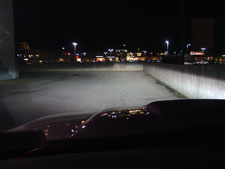
After
Low Beams & Fog Lamps |
Quick Reference Lighting Chart:
|
|