|
Main Menu
|
|
|
|
My 2007 4Runner
|
|
|
|
4Runner History
|
|
|
|
Other
|
|
|
|
|
Concept:
This modification removes the hydrocarbon charcoal emissions filter located in the airbox in order to increase intake airflow.
While normal air filters serve the purpose of removing particulate matter, such as dirt or debris, from the air entering the air intake
manifold, the normal air filter provides little help in preventing evaporative emissions from the intake manifold from entering the
atmosphere. Such emissions are a particular problem when the engine is turned off and the intake manifold is hot. This source of air
pollution has received considerable attention from the federal and state governments with the goal of reducing such emissions.
To that end, the California Air Resources Board (CARB) which effectively sets the maximum air pollution exhaust standards for all
motor vehicles sold in the United States, has passed a regulation which requires that a hydrocarbon trap filter be connected
in series with the air intake of most motor vehicle internal combustion engines.
Designs of such a hydrocarbon trap air filter has resulted in a flat-panel hydrocarbon trap filter relatively permanently secured to a
downstream section of a conventional OEM closed air box, to inhibit tampering, with a conventional flat panel air filter releasably
secured to an upstream section of the closed air box.
The carbon trap filter is formed with one or more layers of granulated activated charcoal (GAC) sandwiched between layers of porous
material such as plastic netting and/or non-woven unipolyurethene surrounding an open core. The porous filter media and GAC may be
confined within a suitable wire mesh to provide structural strength and rigidity.
From the time people began modifying the automobile, one thing they always want to do is to get more air into the engine.
Weather it be a high flow oiled foam air filter, a hole or holes cut into the factory airbox, intake elbow removal, intake silencer removal,
an aftermarket cold air induction kit (CAI), a ram air set-up, or full on supercharger...more air equals more power. Removing the factory
hydrocarbon filter located in the airbox is just one simple (and free) way to increase airflow.
Removal Procedure:
This modification is being performed on the 2007 Toyota 4Runner 4.7L V8. It will be a very similar procedure to do this on the 4.0L V6.
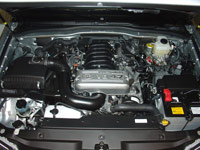
4.7 liter DOHC 32-valve SEFI i-Force VVT-i V8 |
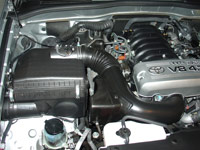
Factory Toyota V-8 Airbox |
Start out by unhooking the 4 clips securing the top half of the airbox to the lower half. While still in place, disconnect the mass
airflow sensor (MAF) wire harness. Then loosen the hose clamp securing the intake air tube to the airbox using a #2 phillips screwdriver.
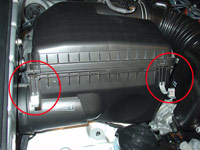
Unhook two front clips |
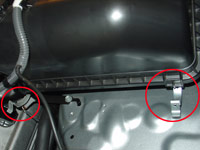
Unhook two rear clips |
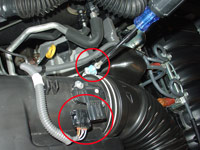
Disconnect MAF wire harness
Loosen hose clamp |
Slide off the air intake hose from the airbox and lift off the top half of the airbox and set aside.
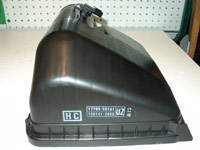
Top half of airbox set aside
Notice the "HC" stamping |
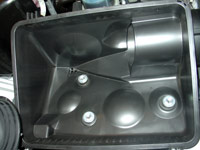
On the underside of the top half of the airbox, you will find the charcoal activated hydrocarbon emissions filter. It is permanently
mounted to the box via six plastic rivets that were melted in place at the factory. Using a sharp chisel, remove two of these rivets
from one side. You can now get your hand underneath the edge and by pulling on the filter frame, the four rivets left will snap off.

Underside of the top half of airbox
Hydrocarbon filter is located here
Six plastic rivets to be removed |
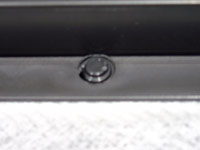
Close up of one of the plastic rivets |
Set the filter aside and take a look at how restrictive it appears.
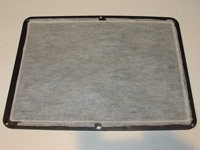
Backside of HCF |
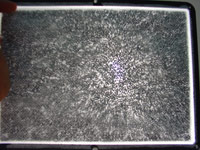
HCF with 75W halogen light behind it |
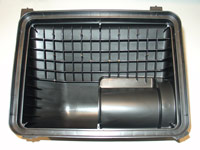
Ensure there are no plastic debris left in the airbox. Inspect your normal air filter while you have the box completely open.
Lift it out of the box and ensure the lower half of the box is clean as well.
Underside of top half of airbox
Hydrocarbon filter removed |
Inside view of the bottom half of the airbox |
Put back the normal air filter and reinstall the top half
of the airbox. Reconnect the MAF wire harness, put back on the intake tube, tighten the hose clamp and enjoy your new found power
and throttle response.
|
|