|
Main Menu
|
|
|
|
My 1999 4Runner
|
|
|
|
4Runner History
|
|
|
|
Other
|
|
|
|
|
One of the easiest and most cost effective ways to improve the handling of
your truck is to install high performance front and rear anti-sway bars.
High performance sway bars decrease body roll and keep the weight of the
vehicle vertically over the tires, reducing drift, wheel lift and understeer.
I have replaced the factory sway bars on my 4Runner with the versions made by
Addco.
Currently, they are the only company that manufactures sway bars for the Toyota 4Runner.
You may notice sway bars marketed by
Performance Products ,
and P-S-T,
but Addco is the manufacturer of the sway bars for both those companies. ,
and P-S-T,
but Addco is the manufacturer of the sway bars for both those companies.
The stiffness, or torque resistance, of an anti-sway bar is proportional to the diameter
of the bar raised to the 4th power.
Therefore a small increase in diameter of an identically shaped sway bar provides a major
increase in anti-sway bar effectiveness.
Please review the chart and pictures below to
see the difference between the Toyota factory bars compared with Addco's version.
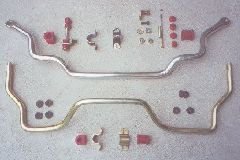
Addco's Toyota 4Runner Sway Bar Kit |
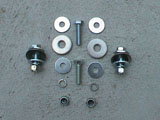
Items NOT included that you need to supply:
4 bolts for the front sway bar brackets, M8x1.25x30mm Grade 8.8, zinc coated
4 nylock nuts size M8x1.25 Grade 8.8, zinc coated, for the front sway bar bracket bolts
4 large outside diameter flat washers, size M10, zinc coated, for the front sway bar brackets
8 large outside diameter flat washers, size M8, zinc coated, for the front sway bar brackets
4 bolts for the rear sway bar brackets, M8x1.25x20mm Grade 8.8
4 flat washers, size M8, zinc coated, for the rear sway bar brackets
8 high collar split lock washers, size M8, zinc coated, for the front and rear sway bar brackets
bushing lube
Front bracket bolts |
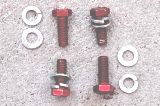
Rear bracket bolts |
Installation:
Installation is straight forward. The job can be completed by one person working alone.
Before starting spray all nuts to be removed with a penetrating lubricant such as WD-40.
Park the vehicle on flat ground. The use of a lift or supporting
the vehicle by the frame and allowing the wheels to hang can cause bar misalignment
and installation difficulties. The 4Runner is high enough to work on without using ramps,
or other means that support the vehicle by the wheels.
I have decided to re-use the front Toyota end links rather than the ones provided by Addco.
The Toyota endlinks have a ball joint built into the lower part and I wanted to retain that feature.
When using the factory front endlinks you cannot use the red urethane bushings provided in the Addco kit.
They are too tall and the nut cannot be put back on.
You can use the Toyota rubber bushings but
I decided to use the firmer Addco black urethane end link bushings up front.
Their low profile works well when you factor in the larger ends of the new sway bar.
When you remove the front sway bar brackets you will notice that it uses captive hardware, ie. it cannot be reused.
Addco does not provide the nuts and bolts you need to install the front brackets.
The specification of the nuts and bolts I used are listed in a section above.
Originally I re-used the rear sway bar bracket bolts, but I do not recommend them.
The factory bolts are M8x1.25x16mm with a 12mm head and they have a split lock washer.
They were a little difficult to get initally threaded in to the frame
due to the slight curvature of the Addco bracket and due to the flat washer
I used to spread the load on the head of the bolt over the larger hole in the Addco bracket.
After a few weeks one of the factory rear sway bar bracket bolts came loose and fell out.
The bracket holding the bar bent and I had to order a new one.
I now am using Grade 8.8 M8x1.25x20mm, with a 13mm head and a split lock washer and a flat washer.
Also I boosted the 14ft/lbs of torque which Toyota recommends up some but
I would recommend to be real careful to NOT strip the threads in the frame.
I guess that would be worse than the bolt falling out?
Addco provides 8 black urethane bushings for the rear endlinks, you need only 4.
They are a little to thin for this application and if you do decide to use them
you will need to shim them up with a few washers in order to get enough torque on the nut.
You can just leave the factory rubber bushings in their place and never
even have to remove the upper nut on the rear end link.
What I decided to do was to use the Addco red urethane bushings for the rear end links.
They fit well, are much firmer and look nice also.

Rear end-link
with red polyurethane bushings |
When you are reinstalling the new sway bar brackets and polyurethane bushings,
use plenty of lube to avoid squeaking and also
make sure the cut in the bushings faces the front of the vehicle.
Effective September 2000 Addco has released a revised 4Runner rear bar.
Some people with the older bar (which includes the red powdercoated
versions that Addco was shipping for a short period) have experienced rubbing between
the rear bar and the exhaust flange. This is dependent upon individual vehicle set-up.
Those that experience rubbing seem to have installed a non-stock exhaust system while
keeping the stock springs, or have just installed lowering springs.
The new bar is the exact same shape but the hump that goes over the driveshaft
is angled up a little more to provide better clearance.
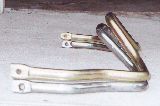
Top = Addco revised bar
Bottom = Addco older bar |
It was necessary for me to lift the vehicle to fish in the new rear sway bar. I accomplished this by placing a wood board
under the rear tow hitch and using that as a jacking point.
Off Road Disadvantages:
For those of you who are concerned with off-road performance as well,
you should take into consideration that the improved cornering performance
comes with a tradeoff. Because the sway bars connect both the left and right
sides of the suspension together, it reduces their independence.
Off road vehicles need as much ability for the axle to articulate as possible
to keep the wheels on the ground while traveling over extremely
uneven terrain such as rocks and gullies. By increasing the size of the
sway bars, you loose some of this articulation ability.
Differential lockers will help compensate for lack of articulation when a wheel is
lifted in the air due to reduced flex, but on extreme trails you need
all four wheels on the ground pulling to make it over steep obstacles.
RockStomper
sells quick disconnects so you can quicky and easily disconnect the sway bars
from the endlinks giving you maximum articulation while off road.
The following table shows measurements I took to see how much
wheel travel is really lost with the larger sway bars
and how much can be gained without any bars connected.
I did not have access to a professional RTI Ramp (Ramp Travel Index),
so I do realize my measurements will not be of exact precision.
Please note these measurements are for my vehicle and yours will vary
based on your individual vehicle set-up. All measurements were taken
with stock springs, shocks, bumpstops, tires and air pressure.
Performance Review:
I feel that the Addco sway bars were well worth the money for the improvement in on-road handling.
They really help to control the near 4,000 pound SUV. It feels more stable at speed.
The rig now corners nearly flat as body roll is significantly reduced.
Originally I had decided to leave the rubber end link bushings on all around. But with the
rear bar disconnected and the rubber bushings installed, you could literally pull on the
end link shaft and really compress the bushings. I am glad I used the polyurethane bushings all around.
I am sure they add to the stability during cornering.
So far the bars do not appear to be too harsh during on-road driving.
I do go off road driving a few times per year, but overall it is a very small
percentage of my mileage. The trails I prefer to take my daily driver on are not too technical anyhow.
So right now I am not too concerned with the
loss of rear wheel travel as explained above.
|
|