|
Main Menu
|
|
|
|
My 1999 4Runner
|
|
|
|
4Runner History
|
|
|
|
Other
|
|
|
|
|
What is a Throttle Body?
In fuel injected engines, the throttle body is the part of the air intake system that controls the amount of air flowing into the engine,
in response to driver input via the throttle. The throttle body is located between the air filter box and the intake manifold. The largest part inside
the throttle body is the throttle plate, which is a butterfly valve that regulates the airflow.
When the driver presses on the accelerator pedal, the throttle plate opens up, allowing more air into the intake manifold. The Mass Airflow Sensor
measures this change in airflow and communicates with the Electronic Control Unit (ECU). The ECU then increases the amount of fuel being sent to the
fuel injectors in order to maintain the desired air to fuel ratio of 14.7:1.
Why should the Throttle Body be cleaned?
Over time the throttle body will get contaminated with foreign matter such as carbon build up and/or varnish and will need to be cleaned.
Throttle body cleaning is good preventative maintenance which should also help engine drivability. If you have noticed rough idle, stumbling upon
initial acceleration, reduced mileage...a dirty throttle body may be the cause.

CRC 05078
Throttle Body & Air Intake Cleaner |
Cleaning Process:
Just as with cleaning your MAF Sensor,
the process to clean the throttle body is so easy and cheap, I recommend it be cleaned every time the air filter is replaced, the same time you should be
cleaning your MAF.
To take advantage of the new found power obtained when cleaning the TB, I like to unplug the EFI relay at the start of this project.
It is located in the engine compartment fuse box. Plugging it back in at the end of this 1/2 hour project is enough time to let the computer reset.
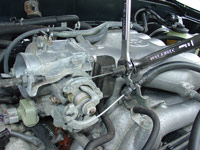
Start out by loosening the clamp that holds the flexible portion of the air intake hose to the throttle body. The clamp uses a phillips screw.
In order to be able to pull this hose off the TB you will need to also remove the two vacuum hoses, the Throttle Position Sensor (TPS) wire harness and the
Idle Air Control (IAC) valve wire harness shown in the pics below. Do not remove the two coolant hoses.
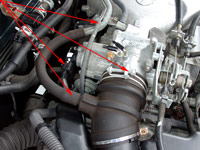
remove hose clamp,
2 vacuum hoses
and TPS wire harness |
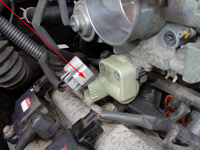
remove IAC wire harness
located underneath the TB |
Place a shop rag below the TB to catch and soak up the cleaning product we will be using. Using an appropriate throttle body cleaner such as
CRC's #05078 Throttle Body & Air Intake Cleaner, spray the cleaner liberally on the throttle body and butterfly valve. Wipe with another shop rag
until clean, using a toothbrush for difficult to reach areas.
You will be able to clean most of the TB via this procedure only. But for a more detailed cleaning, removing the TB to access it's back side is needed.
I don't think you would need to do this back side cleaning every time, but perhaps every other time would be fine.
To remove the TB, start by removing the 2 upper nuts and 2 lower bolts holding it to the intake manifold using a 12mm socket.
remove 2 upper nuts
and 2 lower bolts |
Then, remove the throttle cable and transmission throttle-pressure (kickdown) cable ends from the linkage assembly. To do so, first rotate the linkage by
hand to provide slack in the cable, then push the cable end out of the linkage mechanism. You can leave the cruise control cable in place.
You can now pull the TB outward and off the two upper studs. Using the spray cleaner, clean the back of the TB.
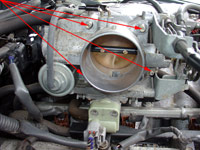
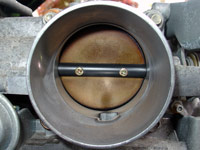
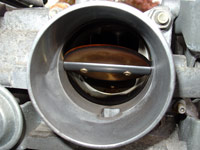
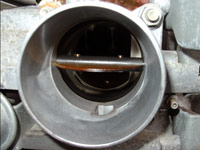
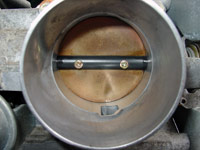
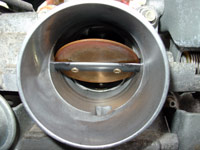
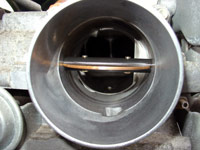
Here is what the before and after TB cleaning pics look like.
|
|
|
| Before Cleaning the Throttle Body |
|
|
|
| After Cleaning the Throttle Body |
TRD 'O' Gasket Mod:
If you removed the TB to clean the back of it, now is a great time to perform the 'O' Gasket Modification.
You will notice that the factory metal throttle body gasket has a 'D' shape to it. Part of this factory gasket blocks the throttle body opening
restricting airflow. TRD makes a throttle body paper gasket which is 'O' shaped and does not block airflow. It is part number PTR26-35041 and made
specifically for the 3.4L TRD supercharger. TRD specifies that if the 'O' gasket is not used in conjunction with their supercharger, reduced boost
output by 1-1/2 lbs will be the result, so you can see that the factory 'D' gasket does indeed impeed airflow. The gasket is simply installed
onto the two throttle body studs and no sealant is to be used. After cleaning and installing the new gasket, bolt back up the TB to the intake
and reinstall the throttle and trans cables.
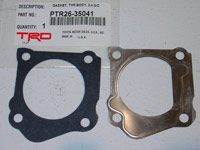
TRD gasket on the left
Factory gasket on the right |

TRD 'O' Gasket overlayed on the Factory "D" Gasket |
Tensioning the throttle cable and transmission throttle-pressure cable:
Lastly, while we are working in this area it is a good idea to check the tension on the throttle and transmission throttle-pressure (kickdown) cables.
They become slack over time. Using two 14mm open ended wrenches, loosen the two nuts holding each cable to it's bracket. Move the nuts to a position
that takes up the slack in the cable, then retighten the nuts.
On the transmission kickdown cable, look for the small metal bead (the stake stopper). If the cable is properly adjusted, the bead should be flush with
the end of the cable’s rubber sheath. The throttle cable does not have this bead, so just adjust it to remove any the slack. You will gain added
throttle response by doing this.
Adjusting the throttle cables |
Put everything else (wire harnesses, vacuum hoses, intake hose), back in reverse order and be sure to plug in the EFI relay if you removed it to reset the vehicle's computer.
|
|