|
Main Menu
|
|
|
|
My 1999 4Runner
|
|
|
|
4Runner History
|
|
|
|
Other
|
|
|
|
|
| Deckplate AirBox Modification: |
Now that my Amsoil Air Filter is allowing more air to pass into the engine,
I needed a way to get more air into the airbox. The "Deckplate Mod" does just that.
The factory air box draws in fresh air via a tube (refer to the intake diagram, item #4) that is inside the passenger fender wall.
This tube, which is like a snorkel, is connected to the airbox through a 90 degree angled elbow (item #7) so that the opening is facing the rear of the vehicle.
The reason is so that during off-road excursions in which water is encountered, water will not be easily ingested as the intake faces rearward.
The trade off with that design is that the 90 degree bend is restrictive and reduces power.
Removing the elbow (item #7) allows air to enter the airbox more easily, and will increase horsepower.
But then each time you go offroad you would need to re-insert the elbow which takes time.
There is a better way, and it is known as the "Deckplate Mod".
Basically you install a marine deckplate on the front of the airbox (item #1).
I purchased a Beckson 4" screw-out all black deckplate, part # DP40-B.
This can be purchased at most any local boating supply shop.
The benefit of using the deckplate is so that when you do take the rig off-road you can spin on the deckplate cover and the air box is sealed water tight.
Here is how I performed the installation:
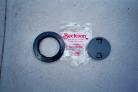
Beckson 4" Screwout Deckplate
#DP40-B |
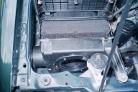
Use a 12mm socket on an extension bar to remove 3 bolts which hold down the box.
Unscrew the clamp (item #12) holding the airbox to the flex tube (item #10) with a philips screwdriver.
Using needle nose pliers, squeeze the clips that hold the mass air flow sensor (item #3) wire harness to the air box.
The airbox will now lift out of the vehicle.
Factory AirBox |
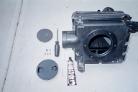
The hole is cut
and ready for sensor-safe
silicon sealant |
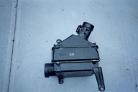
Factory AirBox
removed from vehicle |
Remove the air filter and set it aside. At this point I attempted to remove the MAF which was held in place with two philips head screws.
One of them would not come loose, so I left it in place. I lined the interor of the box with a plastic bag and taped it securily into place.
This was to protect the MAF and to make clean up easier after cutting the hole in the box.
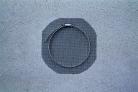
Using the deckplate as a template scribe a circle on the front of your airbox (item #1).
Then cut the hole using either a 4 1/4" hole saw or a dremel tool. Insert the deckplate into the hole and mark the places to drill pilot holes for the 6 screws.
Remove the deckplate and drill 6 pilot holes using a 1/8" drill bit.
Remove the plastic bag which collected most of the material that resulted from cutting and drilling.
Meticulously clean the interior of the air box, I used a vaccum to start off with.
Place a bead of Sensor-Safe Silicon Sealant around the backside of the deckplate and insert it into the hole in the airbox.
Secure the deckplate into place using 6 stainless steel #8 panhead screws that are 1/2" in legnth.
Let the sealant dry.
Cut a piece of screen to approximately 5" in diameter. This will be used as a way to keep large debris out of the airbox such as insects and leaves, etc.
Using a large hose clamp, clamp the screen to the deckplate from the inside of the airbox.
You will need a 1/4" rachet, extension bar with a 5/16" socket and swivel knuckle attached to tighten down the clamp.
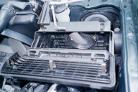
Re-install the air filter, I recommend installing a high flow air filter at this time if you have not already done so.
Re-install the airbox into the vehicle, and you are done!
Insect screen
and adjustable clamp |
Some of the 4Runner and Tacoma owners who have performed this mod, dyno tested it. They say it adds about 7 rear
wheel horsepower. It also gives the engine a nice deep sounding tone when you get on the gas hard.
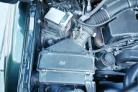
Installation complete
Notice the Amsoil Hi-Flow Air Filter |
View from inside
showing insect screen installed |
|
|