|
Main Menu
|
|
|
|
My 1999 4Runner
|
|
|
|
4Runner History
|
|
|
|
Other
|
|
|
|
|
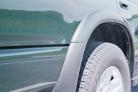
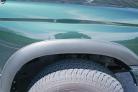
I have the Toyota SR5 Factory Fender Flares on my vehicle. They are black unpainted textured plastic.
They come as standard equipment on 1999 4Runner SR5 Highlanders.
They were available as optional equipment on 1996-1999 4Runners from the factory,
and can be purchased from any Toyota dealer for use on 1996-2002 4Runners.
Matching end caps and mudguards are availabe for use with and without running boards.
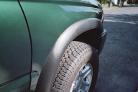
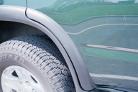
Flare without trim |
A nice feature about these flares is that they are attached to the vehicle using bolts drilled in the wheel well area.
This means they can be removed (which I now do once per year) for cleaning and waxing the body underneath the flares.
The larger painted over flares on the 1996-2002 Limiteds and 2000-2002 SR5s are attached using clips through holes that are drilled into the body, making removal difficult at best.
A lot of dirt accumulates behind the flares over time.
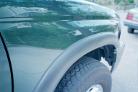
Due to the fact that Toyota delivers these flares without flare trim (otherwise known as a flare gasket, or flare pad),
the plastic flare touches the painted body and results in a line of paint being scratched off where contact is made.
I noticed my clear coat getting buffed off the first time I decide to remove the flares for a good cleaning, which was when the vehicle was 2 years old.
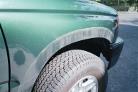
Body washed
flare removed
dirt exposed |
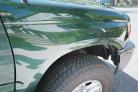
Body washed and waxed,
notice the line of clear coat
buffed out by flare |
I have always liked the way the 4Runner Limiteds have a rubber moulding between their painted fender flares and the body.
I decided to duplicate this effect on my Toyota SR5 factory black unpainted textured plastic flares.
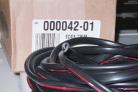
At first I ordered Bushwacker
part # 000042-01 which is 30 feet of black self-adhesive flare edge trim used on their aftermarket flares.
I did not like this as it is "U" shaped, just like door edge trim. It did not hug the contours of my flares and also looked too thick.
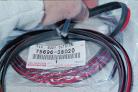
Upon further research I noticed the year 2000 Toyota TRD Tacoma has similar unpainted black plastic flares which does have factory flare trim on them.
The part # is 75696-35020 which is a 5ft legnth of black rubber padding with self adhesive tape on it.
The part number is for the passenger side rear 2000 TRD Tacoma flare.
I ordered five (5) 5ft. pieces which is enough to do all 4 flares, 2 front endcaps and 4 mud guards.
Installation is simple. Start of by removing the flares using a 10mm socket. The piece attached directly to the rear doors are removed with a philips screwdriver.
To remove the front end caps use a 12mm socket. Clean all removed items with soap and water, then dry.
Swab the area on the backside of the flares where you will put the flare trim using an alchol pad.
Cut the flare trim to the legnth of the individual flare section you will work on.
Remove a little of the red tape backing at a time and press onto the back of the flare, allowing the flap to cover the front of the flare.
Take some time to thouroghly wash and wax the now exposed body sections of the vehicle. Then reinstall flares, boots and/or mud guards.
Bushwacker flare trim
notice the "u" shaped profile |
Toyota trim
notice the "h" shaped profile |
|
|
|
|
| Flares with the trim installed |
|
|