|
Main Menu
|
|
|
|
My 1999 4Runner
|
|
|
|
4Runner History
|
|
|
|
Other
|
|
|
|
|
After reading through Gadget's
brake flushing page which details the many ways to go about flushing your brake system,
I knew the Motive Products
one man brake bleeding system was the way to go when it comes time to flush the brake fluid.
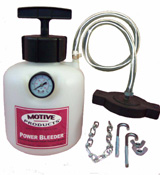
Motive Power Bleeder |
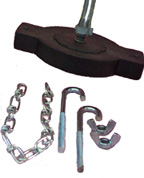
Motive Products
Round Universal Adapter #1101 |
Brake fluid absorbs water from the atmosphere, lowering its boiling point and causing corrosion.
It also can become contaminated by microscopic particles of rust and rubber which promotes abnormal
wear on brake components like calipers, wheel cylinders, master cylinder and anti-lock brake system components.
Boiling can occur when traveling down a steep grade, towing, when a brake pad is stuck against a rotor, performance driving, etc.
When brake fluid boils, the effect on performance is the same as having air in the system,
the pedal can travel to the floor without slowing or stopping the vehicle.
In cold weather, brake fluid with a high water content is very viscous causing slow pedal response and requiring more effort.
Flushing the brake system will help to prevent costly repairs to these components due to contamination and corrosion
as well as help to keep the boiling point high as possible.
Power flushing the brake system is very basic, and took me about 90 minutes the first time I tried it.
I started out by gathering the following items:
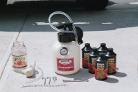
Items needed for brake system flush |
Flushing Procedure:
First thoroughly clean the brake fluid reservoir and cap (before opening it) so as to avoid contaminating the system with dirt.
Then proceded to open the reservoir cap and using the turkey baster siphon out as much brake fluid as you can.
There was a strainer in my reservoir which I removed temporarily to get the baster in as far as possible.
My reservoir was a two chamber type and I could only remove half the fluid.
The more you can get out the better, as you want to push as little of the old fluid throughout your system as possible.
refill the reservoir with Toyota DOT3 brake fluid.
Attach the empty Motive Power Bleeder to the brake fluid reservoir by placing the bleeders cap where the original cap was.
Wrap the chain under the reservoir and onto the two J-hooks that are threaded into the cap and tighten down the wing nuts to make a good seal.
Then pump the bleeder up to 15lbs and see if it holds that pressure.
At this point, you are just checking for leaks at fluid reservoir and bleeder hose connections.
If there is a leak, release accumulated pressure in the power bleeder by gently unscrewing the pump cap.
Fix the leak issue and test again. When no leaks are found you are ready to move to the next step.
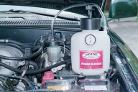
Bleeder attached to brake reservoir |
Release accumulated pressure in the power bleeder by gently unscrewing the pump cap.
Fill bleeder with new brake fluid. Brake fluid is very corrosive so do not get it on your paint.
The bleeder can handle being filled with up to 2 quarts (64oz.) of fluid.
Originally I purchased 5 12oz. bottles but later calculated I only needed 3 12oz. bottles for my 1999 Toyota 4Runner SR5 4WD.
You may need more than 3 bottles if you have VSC and/or TRAC control which became standard equipment in 2001.
Put the screw cap back on the bleeder and tighten it down. Pump the handle on the cap until the gauge reads 15lbs.
Slide under the vehicle and clean off the bleeder valve that is on the wheel furthest from the master cylinder, the passenger rear wheel.
Put the 10mm closed end wrench on the valve first. I prefer to use a closed end wrench to help avoid stripping.
Attach the clear hose that came with the Motive bleeder kit and insert the end of it into a container you will use to collect the old fluid.
The included hose is not that long so I put a piece of wire around the collection bottle and attached it to the coil spring to hold it in the air for me.
You may prefer to purchase a longer hose locally. Then unscrew the bleeder valve and watch the fluid that comes out.
When the new fluid starts to come out clean without air bubbles tighten the valve back down.
Repeate this procedure at the next 3 wheels in this order...driver side rear, passenger front, driver side front.
After bleeding the first two wheels I gave the bleeder a few more pumps to bring the pressure back upto 15lbs.
This was not really necessary as I was still had 10lbs. of pressure left, but it is a good idea to check the pressure after each wheel is blead.
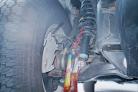
Bleeding at the front passenger wheel |
If fluid remains in the Power Bleeder tank when through, tilt the tank away from fluid pick-up tube
and release accumulated pressure in the power bleeder by gently unscrewing the pump cap.
Loosen the wing nuts and remove the bleeder reservoir cap.
Ensure that the level of new brake fluid in the reservoir is at the maximum mark.
In my case I had to siphon off a little to bring the level down to the max mark.
Put the Toyota factory reservoir cap back on. Test for proper brake operation and for leaks before driving.
You are done!
|
|